Showing posts with label cookies. Show all posts

Monday, September 27, 2010

Sep 27, 2010: Daring Bakers - Decorated Sugar Cookies


The September 2010 Daring Bakers’ challenge was hosted by Mandy of “What the Fruitcake?!” Mandy challenged everyone to make Decorated Sugar Cookies based on recipes from Peggy Porschen and The Joy of Baking.

She has challenged us to make Decorated Sugar Cookies. She's not talking squiggles random squiggles and dots. She's talking about beautifully decorated cookies that are perfect to give as a gift or to make for party or wedding favours. On top of that, we should theme the cookies around the month of September.

For the cookie, Peggy Porschen’s recipe is ued for the challenge recipe. Sugar cookie recipes commonly have either baking powder or bicarb of soda, but this recipe is a little different in that it doesn’t use a raising agent which makes them great so if you’re using intricate cookie cutters, they hold their shape while baking. Perfect for decorating with royal icing!

[My comments are in red... I'm inexperienced at decorating so there's no way I can make wedding favors... lol.]

[This will be my last Daring Baker's challenge.]

[Life has been very busy and trying to do both a Daring Bakers and Daring Cooks challenge in a month has been difficult to complete with the detail and time I like putting into each challenge.

Also, I don't feel right calling myself a "Daring Baker" if I'm not doing ALL the challenges (even if we are given an option of miss a few challenges a year) or cherry picking the challenges that fit my schedule.

Since I have two years of Daring Baking under my belt where I completed 26 out of 27 challenges, I've decided to retire from Daring Bakers and focus on Daring Cooks. :-)

Who says that guys are afraid of commitment? lol!]

Recipe Source:
Basic Sugar Cookie recipe adapted from Peggy Porschen : http://www.peggyporschen.com/images/press/pdf/Coso-Bride-Oct-Nov-2008.pdf
Also found in her book: “Romantic Cakes” http://www.peggyporschen.com/book-detail.asp?ID=2
Royal Icing recipe adapted from The Joy of Baking : http://www.joyofbaking.com/RoyalIcing.html

Mandatory: You must make the Basic Sugar Cookie recipe provided (unless specific diet restrictions apply) You must make your cookies with the theme of September, whatever that means to you.
Variations allowed:
You are allowed to add your own flavourings to the dough
You don’t have to make your own royal icing from scratch, you may use a store bought mix.

Basic Sugar Cookies:
Makes approximately 36 x 10cm / 4 inch cookies
200g / 7oz / ½ cup + 6 Tbsp Unsalted Butter, at room temperature
400g / 14oz / 3 cups + 3 Tbsp All Purpose / Plain Flour
200g / 7oz / 1 cup Caster Sugar / Superfine Sugar
1 Large Egg, lightly beaten
5ml / 1 tsp Vanilla Extract / Or seeds from 1 vanilla bean

[Fortunately, this challenge doesn't require a lot of ingredients and fancy preparation or equipment.]


Directions:
Preheat oven to 180°C (160°C Fan Assisted) / 350°F / Gas Mark 4.

Cream together the butter, sugar and any flavourings you’re using. Beat until just becoming creamy in texture. Tip: Don’t over mix otherwise you’ll incorporate too much air and the cookies will spread during baking, losing their shape. Beat in the egg until well combined, make sure to scrape down the sides of the bowl.

Add the sifted flour and mix on low until a non sticky dough forms. Tip: I don’t have a stand mixer so I find it easier to switch to dough hooks at this stage to avoid flour flying everywhere.

[I used a hand mixer to incorporate a majority of the ingredients. The dough needed some kneading to consolidate the crumbly dough. I poured it all into a ziploc bag and kneaded. No messy hands! lol!]


Knead into a ball and divide into 2 or 3 pieces.

Roll out each portion between parchment paper to a thickness of about 5mm/1/5 inch (0.2 inch) Refrigerate for a minimum of 30mins.

Cut out shapes with cookie cutters or a sharp knife. Arrange shapes on parchment lined baking sheets and refrigerate for another 30mins to an hour. Tip: It’s very important you chill them again otherwise they’ll spread while baking. Re-roll scraps and follow the above process until all scraps are used up.

[After the dough was rolled between parchment paper, a 3" cookie cutter was used to make rounds.]


[Rounds ready for baking at 350F for 15 minutes. 8 minutes didn't brown the cookies enough]


Bake until golden around the edges, about 8-15mins depending on the size of the cookies. Tip: Bake same sized cookies together otherwise mixing smaller with larger cookies could result in some cookies being baked before others are done. Tip: Rotate baking sheets half way through baking if your oven bakes unevenly.

Leave to cool on cooling racks. Once completely cooled, decorate as desired. Tip: If wrapped in tinfoil/cling wrap or kept in airtight containers in a cool place, un-decorated cookies can last up to a month.

[I opted to avoid using raw egg whites so I used Wilton meringue powder instead.]
Royal Icing
3 T Meringue Powder
1 lb Powdered Sugar
6 T Water

Beat until stiff peaks.

[For the meringue, I used food coloring to make a yellow color and 1 tsp of cocoa powder mixed with a little water (to form a slurry which makes for easier mixing into the royal icing) to make a dark meringue.]


SEPTEMBER THEME: SUNFLOWERS
I've always been fascinated with sunflowers. These are tall, majestic plants that are able to follow the sun and give us sunflowers seeds to eat. Sunflowers are usually abundant in September.

Last year, a sunflower grew in a patch of soil where no seeds were planted. I think it was a seed from two years ago that survived the winter and decided to grow the following year.

Here's my "evolution of the Sunflower" photo. As I mentioned, I'm not that good at piping, especially when using a plastic storage bag with a end cut off. You can see the different things I've tried to to come up with something decent looking.


Early attempt at piping the petals. I tried to form a leave.


As I experimented around, I started piping lines... which looks better.


Finally, more lines and a ring in the center to hold the eye.


My flower arrangement... lol


Of course, the best looking cookies were in the center. :-)


My inspiration... I'm not sure if this is a sunflower that was in the bouquet, but I think it is. :-)

I've had fun in my 2 years (and a bit) as a Daring Baker. I enjoyed learning new things... My favorites are salted caramels, making puff pastry and making cannoli. The salted caramel is a recipe I make quite often as gifts. :-)

On to Daring Cooks!

Monday, July 27, 2009

Jul 27: Daring Bakers' Cookies!

This is my one year anniversary challenge as a Daring Baker!

Hard to believe that a year ago my fingers were developing a callous and aching. I was cussing out the hazelnuts I was skinning. While spending the whole day (it was a hot day too) in the kitchen making a tremendous mess, I was asking myself, "Geez! What have I gotten myself into?"


That was the July 2008 challenge, a Filbert Gateau with Praline Buttercream. If you're interested, take a read of the challenge,
July 2008 DB Challenge.

What a difference a year makes!
I'm more at ease with the DB challenges, but I still make a mess, use every pot, pan, baking dish and utensil I can find. It's a guy thing.


Moving forward to 2009...
The July Daring Bakers' challenge was hosted by Nicole at Sweet Tooth. She chose Chocolate Covered Marshmallow Cookies and Milano Cookies from pastry chef Gale Gand of the Food Network.

For the challenge, you choose one or do both recipes. Of course, I daringly made both recipes. :-)
Milan Cookies
Recipe courtesy Gale Gand, from Food Network website
Makes about 3 dozen cookies.

• 12 tablespoons (170grams/ 6 oz) unsalted butter, softened
• 2 1/2 cups (312.5 grams/ 11.02 oz) powdered sugar
• 7/8 cup egg whites (from about 6 eggs)
• 2 tablespoons vanilla extract
• 2 tablespoons lemon extract [I opted to use 1 T Almond Extract. I was leery of using 2T of almond extract so I used 1 T. I could have gotten away with 1.5 T]
• 1 1/2 cups (187.5grams/ 6.61 oz) all purpose flour
• Cookie filling, recipe follows

Cookie filling:
• 1/2 cup heavy cream
• 8 ounces semisweet chocolate, chopped [I used semisweet chocolate chips]
• 1 orange, zested [I left out the orange zest]

The recipes implies using a stand mixer. I used a hand mixer instead.
1. In a mixer with paddle attachment cream the butter and the sugar.
2. Add the egg whites gradually and then mix in the vanilla and lemon extracts.
3. Add the flour and mix until just well mixed.

The flour being mixed into the batter. Yes, the cookie dough was like a thick batter... instead of being a firm dough.


4. With a small (1/4-inch) plain tip, pipe 1-inch sections of batter onto a parchment-lined sheet pan, spacing them 2 inches apart as they spread.

I don't have a 1/4-inch plain tip so I used my favorite tool - the Ziploc bag with a 1/4-inch corner cut off. Using the real Milano as a guide, I piped a swirl pattern.


5. Bake in a preheated 350 degree oven for 10 minutes or until light golden brown around the edges. Let cool on the pan.

The dough spread out and the swirl all melded together. This resulting cookie is reminiscent of the tuile challenge from January. Darn... I was hoping to get the little pip like the real Milan cookie.


6. While waiting for the cookies to cool, in a small saucepan over medium flame, scald cream.
7. Pour hot cream over chocolate in a bowl, whisk to melt chocolate, add zest and blend well.
8. Set aside to cool (the mixture will thicken as it cools).
9. Spread a thin amount of the filling onto the flat side of a cookie while the filling is still soft and press the flat side of a second cookie on top.

The thin coating of chocolate is applied. One coat for the cookie. One lick for me. One coat for the cookie. One lick for me. Oops... for a second I thought I was Paula Deen. :-)


10. Repeat with the remainder of the cookies.


The second part of the challenge had a cookie component and a marshmallow component.
I've always wanted to make my own marshmallows, but I just didn't have the time. However, for the challenge I made time.

Mallows (Chocolate Covered Marshmallow Cookies)
Recipe courtesy Gale Gand, from Food Network website
Prep Time: 10 min
Inactive Prep Time: 5 min
Cook Time: 10 min
Serves: about 2 dozen cookies

• 3 cups (375grams/13.23oz) all purpose flour
• 1/2 cup (112.5grams/3.97oz) white sugar
• 1/2 teaspoon salt
• 3/4 teaspoon baking powder
• 3/8 teaspoon baking soda
• 1/2 teaspoon ground cinnamon
• 12 tablespoons (170grams/ 6 oz) unsalted butter
• 3 eggs, whisked together
• Homemade marshmallows, recipe follows
• Chocolate glaze, recipe follows

The recipes implies using a stand mixer. I wanted to try making the cookie dough in a "less mess", self-contained, easy to clean method... In other words, I just threw everything into a plastic storage bag and squeezed the bag to mix. It actually worked nicely.

1. In a mixer with the paddle attachment, blend the dry ingredients.
2. On low speed, add the butter and mix until sandy.

Softened butter is a must for this "all in the bag" method.


3. Add the eggs and mix until combine.

This shot was taken to show the crumb texture of the flour-butter mixture.


4. Form the dough into a disk, wrap with clingfilm or parchment and refrigerate at least 1 hour and up to 3 days.

5. When ready to bake, grease a cookie sheet or line it with parchment paper or a silicon mat.

6. Preheat the oven to 375 degrees F.

7. Roll out the dough to 1/8-inch thickness, on a lightly floured surface. Use a 1 to 1 1/2 inches cookie cutter to cut out small rounds of dough.

Looking at my cookie cutters, they were 2 to 2.5 inch in diameter. I found that the cap to the spice jar was just a touch over 1.5" diameter. The cap was used as my cookie cutter. :)


8. Transfer to the prepared pan and bake for 10 minutes or until light golden brown. Let cool to room temperature.

Note: if you don’t want to make your own marshmallows, you can cut a large marshmallow in half and place on the cookie base. Heat in a preheated 350-degree oven to slump the marshmallow slightly, it will expand and brown a little. Let cool, then proceed with the chocolate dipping.

Onto the fun part!
Homemade marshmallows:
• 1/4 cup water
• 1/4 cup light corn syrup
• 3/4 cup (168.76 grams/5.95oz) sugar
• 1 tablespoon powdered gelatin
• 2 tablespoons cold water
• 2 egg whites , room temperature
• 1/4 teaspoon pure vanilla extract

1. In a saucepan, combine the water, corn syrup, and sugar, bring to a boil until “soft-ball” stage, or 235 degrees on a candy thermometer.
2. Sprinkle the gelatin over the cold water and let dissolve.
3. Remove the syrup from the heat, add the gelatin, and mix.

Mixing the gelatin into the hot syrup. The bowl below is my original gelatin mixture. For some reason, I got into my head that the gelatin is bloomed in 2 Cups of water. It didn't make sense and fortunately I reread the recipe. 2T of water! NOT 2 cups! lol! I must be on a sugar high!


4. Whip the whites until soft peaks form and pour the syrup into the whites.

This marshmallow recipe called for using egg whites.
Gasp! Raw egg whites!!! Are you Crazy???
Well... pouring in the 230 F syrup and mixing takes care of any beasties in the raw egg.
That mixture was very hot! I could feel the heat on the bottom of the bowl.
Heating to 160F for a few minutes kills off any bacteria. At least that's what I'm telling myself.


5. Add the vanilla and continue whipping until stiff.

Hot syrup and eggs being mixed together! Whipping the eggs to soft peaks took about a minute. Whipping this mixture to something stiff took about 10 to 15 minutes!


10 to 15 minutes later! Whew! I thought I messed up when the mixture didn't stiffen up. I just kept mixing and mixing and mixing. Finally, I noticed the beater was leaving a trail in the marshmallow so I knew I was getting somewhere!


6. Transfer to a pastry bag.

Chocolate glaze:
• 12 ounces semisweet chocolate
• 2 ounces cocoa butter or vegetable oil

1. Melt the 2 ingredients together in the top of a double boiler or a bowl set over barely simmering water.

Assembling the Mallows
1. Pipe a “kiss” of marshmallow onto each cookie. Let set at room temperature for 2 hours.

Another Ziploc with the marshmallows!
The cookies baked with the top a little rounded/dome-like. I wasn't sure if the marshmallows would be soupy and runny when I piped it or it would retain it's shape. The cookie was flipped over for the marshmallow kiss. I reasoned the bottom, being flat or slightly concave, would hold the marshmallow better than the top.


2. Line a cookie sheet with parchment or silicon mat.

I only baked 1/3 of the cookie dough and the yield was about 36 to 42 cookies. The recipe states it makes only 2 dozen. Hmmm... I made 3 to 4 dozen using only 1/3 of the dough. There's a disconnect somewhere.


3. One at a time, gently drop the marshmallow-topped cookies into the hot chocolate glaze.

The chocolate dipping process! The chocolate was in a double boiler and was still rather thick. I used the fork to roll the cookie in the chocolate.


4. Lift out with a fork and let excess chocolate drip back into the bowl.

5. Place on the prepared pan and let set at room temperature until the coating is firm, about 1 to 2 hours.

A few done and hundreds to go! LOL!
These cookies are best made during a cool day... which I didn't have. The chocolate took about 4 hours to set.


The Final Results
So how did these cookies compare to the commercially available products?
Let's take a look.


The Milan0s

On the left, the homemade Milanos.
On the right, the store-bought Milans.

The cookie of the real Milanos are more like a shortbread cookie, while the homemade Milanos are softer more Tuile=like. Also, the homemade Milanos become softer when exposed to the air.

The flavor of the homemade Milanos are actually better with complex and pleasing flavor - vanilla with a hint of almond. The store bought Milanos are mainly sweet and crunchier.


The Mallows

The mallows turned out to be my favorite! The cookie has a nice cinnamon flavor without being overpowering. The marshmallow turned out very well - light and fluffy.

As the day went on, I was running out of chocolate. What I opted to do was coat the bottom of the cookie and use a little parchment coronet to pipe chocolate on the top (the cookies on the right). One thing I found out about cooling chocolates, if you cool too fast like I did by using the refrigerator (the cut sample), the chocolate will bloom which results in a dull, sandy appearance. This is due to the chocolate forming large crystals. Blooming doesn't effect the taste, it's more of an appearance thing. At least, I didn't notice a change in taste. :)

Overall, a fun and easier challenge for my one year anniversary challenge. Both cookies turned out nicely, but my favorite is the mallows.

Monday, March 24, 2008

Playing with Puff Pastry 2

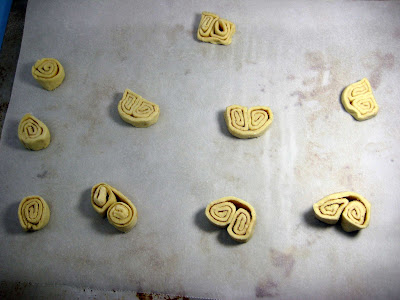
I had a partial sheet of puff pastry dough leftover from my Beef Wellington dinner. The leftover bits of puff pastry dough measured roughly 3 inch x 9 inch, plus a 2" x 9 inch trim piece.

I made butterfly cookies which are also known as palmier cookies.

Butterfly cookies were popular when I was younger when we'd go to Chinatown. A local bakery sold these treats that were easily the size of a saucer. The cookies were flaky, crispy, slightly sweet and had a light glaze.

The leftover bits are too small to make gigantic saucer-size treats, but large enough for a small palm-size cookies.

The method:
1. Lay the flat sheets on the counter, sprinkle sugar on both sides, as if you were making cinnamon toast. In fact, I sprinkled some cinnamon sugar on the "inside".

2. Roll the sheets forming a roll or roll from both ends so the spiral meets in the middle.

3. Cut the spirals to about a 1/4" thickness.

4. I used parchment paper so the the cookies wouldn't stick. Would they stick without parchment paper? I'm not sure.


5. Bake 425F for about 12 minutes. I checked at 10 minutes and let the cookies bake until golden brown.


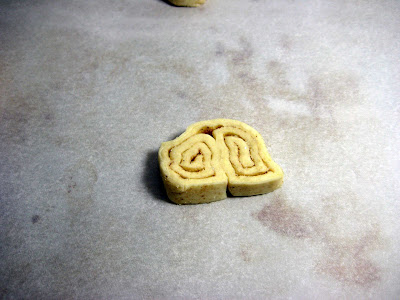
Close-up: Before baking


Close-up: After baking (same cookie) :-)