Starting the charcoal
The Cowboy brand lump charcoal was purchased 3 years ago and is mainly small pieces of scrap wood, too small to really do much. However, I found they light pretty easily and are great in the bottom of the chimney starter.
With a few pieces of lump charcoal on the bottom, I fill the rest of the chimney starter with briquettes. Big bags purchased at Costco. Too bad I didn't buy stock in Costco, I've seem to mention Costco a lot and go there quite often.

While the coals are lighting, I prepared two hickory wood packets used to generate the smoke.
Many websites and food shows recommend soaking the wood before throwing them directly on the coals. I found this method generates too much smoke at once and supposedly creates more carcinogens.
A handful of hickory chips.

Wrap the chips in heavy duty foil and puncture the pouch with a toothpick. Wrapping the wood chips prevents the chips from burning, since you're depriving the oxygen, and the small hole allows the flavoring smoke to escape a little at a time. Besides, the wood chips will probably poke out at places in the pack creating more smoke, as in the bottom left of this pack.

Two slabs of ribs in a newly purchased rack. The rack allows more ribs to be cooked at once.

Once the coals are ready, I dumped them into the firebox and allowed the smoker to come up to 250F.
When the smoker is at 250F, the ribs were placed in the cooking compartment.
Ribs were basted and the rack rotated every 20 minutes.
I try to maintain a temperature between 200F and 250F. I found just placing two or three lit briquettes in the cooking compartment helps.

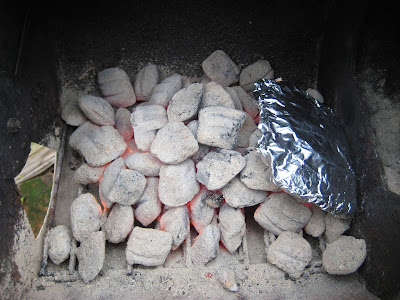
The wood chip packet placed on the coals.
Note the coals are to the side of the ribs in a separate compartment, indirect cooking.
After the first hour, the second hickory pack was used. The chips from the first pack have converted to charcoal so I just dumped those spent wood chips onto the coals.
I started kind of late and was cutting it close to the start of the party.
Ideally, the ribs would smoke/cook for 4 to 5 hours.
This is how the ribs looked at 2.5 hours into cooking.
Next, I gave the ribs a final baste and moved the ribs into a 325F oven for about 45 minutes.
The aroma was mouth watering. The smell of the hickory smoke and the seasonings were enticing.

The ribs out of the oven. Seeing the dark edges around the ribs, I was kind of worried that I dried out the ribs.

However, the ribs sliced very nicely and a quality control taste eased my concern about burnt, dry chewy ribs. The ribs had smoky, savory flavor.
Texture was nice - tender not mushy.
Note: The pink you see in the ribs is not raw meat. This is due to the smoking, known as a smoke ring.
Personally, I like to eat ribs dry (no sauce) especially when they have a lot of flavor. If I do use sauce, I lean towards a vinegary sauce. Most commercial brands just seem too sweet to me.

Recipes:
Basting Sauce - used while the ribs were smoking.
1 C Cider Vinegar
3/4 C Oil
1/4 C Worcestershire Sauce
4 T Butter
3 Cloves
2 cloves Garlic, mashed
1/2 Onion, sliced
1T Mustard, Yellow Prepared
1 Lemon, sliced
Add everything to a sauce pan and let heat about 10 minutes.
Barbecue Sauce - a vinegary sauce used as a condiment.
1.5 Cups of Tomato Sauce (Sauce I made a few days ago)
1 Cup Cider Vinegar
1/2 Onion, Chopped
2 Cloves Garlic
3 Cloves
1T Worcestershire Sauce
1 T Prepared Mustard
1/4 C Apple Juice
Heat and cook to reduce/thicken.
As I was tasting, I eventually add 1 T molasses, 1 T brown sugar and 1/2 t of sambal chili sauce.
Yesterday's Prep Work
Barbecue Links:
Garry's BBQ Pit - the basis of my basting sauce (mop) and my bbq sauce
Barbecue Institute - recipes and bbq cooking class which was fun and informative.
Virtual Weber Bullet - smoking tips and recipes

No comments:
Post a Comment