Monday, June 30, 2008

Jun 30: Puff Pastry Fun

Today, more fun with puff pastry.

I have store-bought puff pastry in the freezer and Shawn purchased some black raspberries from Trader Joe's.*

Although the weather has been hot, mid-80's F inside, today was a lot cooler, mid-70's inside, I've been eager to bake a dessert using puff pastry and the berries.

Thumbing through Julia Child's The Way to Cook I spotted a couple promising recipes. Also, searching through the internet, I found a recipe for Jalousie from the Fine Cooking magazine website - Mixed Berry Jalousie.

According to Julia Child, Jalousie (Ja-la-see) is the French name for Venetian blind.

Mixed Berry Jalousie
Preheat oven: 400F

The Fixins'
12 oz Black Raspberries (Original recipe calls for 14 oz of mixed berries)
1/4 cup granulated sugar (I weighed out 50 gram of sugar)
1 tsp fresh lemon juice
Pinch cinnamon
Pinch salt
1-1/2 Tbs. cornstarch
1 large egg + 1 T water
1 sheet frozen packaged puff pastry, thawed
1 packet of turbinado sugar (I used a Sugar in the Raw packet which is about 3/4 tsp)

Cooking the berries:
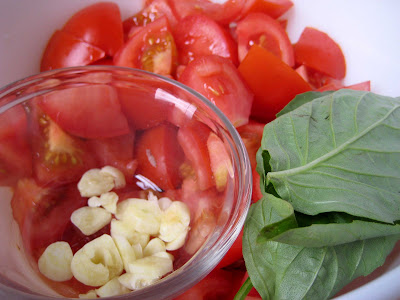
1. In saucepan, stir together the berries, sugar, lemon juice, cinnamon, and salt.
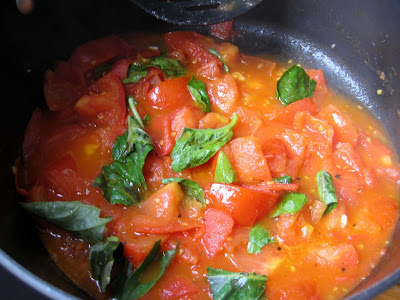
2. Heat and simmer, stirring gently from time to time, until the berries release juices and soften about 8 to 10 min.
3. With a slotted spoon, scoop out the berries into a bowl, letting as much juice as possible drain through the spoon. Reserve the juices in the pan.
4. Dissolve the cornstarch in 3 Tbs. cold water. Whisk into the juices in the pan. Bring to a boil over medium-high heat, stirring with a wooden spoon, until the mixture is very thick, about 1 to 2 minutes.
5. Mix and fold the sauce into the bowl.
6. Let cool.

The puff pastry
7. Unfold the puff pastry onto parchment paper and roll with a pin. I was worried about rolling to thin since the kitchen was hot and I'm not too familiar with puff pastry. My puff pastry sheet ended up roughly 10 inch x 12 inch semi-rectangular and semi-hour glass... lol.
8. Cut the puff pastry sheet in half along the long edge.
9. Brush egg wash (1 egg + 1 T water) along the edges of one half. The other half I made slits in the dough. The recipe suggest folding the top sheet in half and making the slits. I was worried that the heat would fuse the sheet together.


10. Brush the other half with egg wash along the edges, creating a 1 inch border, and fill with the berry mixture between the egg wash border.


11. Place the slit puff pastry over the mixture.


12. I squared off the pastry by folding the extra dough over and crimping with a fork.


13. Brush the top with egg wash and sprinkle on the turbinado sugar.


14. Bake for 15 minutes and rotate and bake another 10 minutes. Since it was a hot day and the dough was soft, the pastry cooked in about 20 minutes.

15. Remove from the oven and set onto a cooling rack.


The Final Dish
Served with freshly whipped cream.
1 C heavy cream
3 T sugar
1 t of vanilla.


The puff pastry did puff and was crispy, even though the dough was soft from the very warm kitchen and the rolling. The berries were nice. Nice berry flavor and sweet, but not overly sweet. I tend to avoid berries since they can be tart.

*Note: Shawn and I had a bet on who would walk the pups. She bet that we had black berries. I claimed we had raspberries. Looking at the package, we purchased "Black Raspberries." I guess we were both right. Looks like no walk for the pups... just more treats. lol!

Sunday, June 29, 2008

Jun 29: Vegetable Garden Status

Hot! Hot! Hot! These past few days: 80's and low 90's.
I was curious how the veggies were progressing in my garden.

April 12th: planted beets and carrots.

Today, I pulled a beet and a carrot to see how they're progressing. The package suggest 60 days to maturity, but during the Spring, we had only a couple days of sun per month so the plants were really growing slowly due to a low heat index.

Carrot is developing the desired spherical shape. The beet still more carrot looking than spherical looking. I'm guessing both are at least 2 to 3 week from maturity.


May 15th: started sunflowers, Thai Basil and Brussels sprouts.

The Thai Basil - flopped. A couple seed sprouted and died back. These seem very hard to grow and very slow to germinate.

Brussels sprouts are in the ground and growing very slowly. 5 out of 10 were eaten by slugs.


Sunflowers are in the ground, but 7 of 10 were hit by slugs and snails.
One of the few


Sunflower #7 bites the dust. Slug ate well this morning before he met Mr. Heel.


I have a little fig tree... actually more like a fig twig I purchased late in the season last year on the clearance desk.

Lone Peter's Honey Fig.

Sunday, June 22, 2008

Jun 22: Creme Brulee (Burnt Cream)

A few years ago I received a Creme Brulee Set as a present (Thanks Shawn!). The set contained four porcelain ramekins and a torch.

Since I'm a budding pyro, the torch was the first piece I used. However, I did not make the dessert until today.

The recipe contained in the set was very straight forward and simple.

Creme Brulee (Burnt Cream) is a silky smooth custard dessert with a crunchy sugar topping.

The Fixins'
3/4 C Heavy Cream... Today I used whipping cream.
1T + 2 tsp Sugar... For some reason, I had stuck in my mind 3/4 C sugar and measure it out... thinking that's a lot of sugar. Fortunately, I reread the recipe.
2 Egg Yolks
1/2 t vanilla

Preheat oven, 300F and boil some water - I used 1 cup.

1. Combine cream and sugar in a small saucepan over medium heat. Cook and stir occasionally to a simmer... about 5 to 6 minutes.

2. In a separate bowl, beat egg and vanilla until light.

3. Slowly add that hot cream mixture into the beaten egg to temper the eggs. Continue adding and beating the mixture.

4. In a baking pan, arrange ramekins. Pour in brulee mixture evenly into each ramekin.

5. Pour the boiling water into the baking dish so the brulees will bake in a water bath. Water should be halfway up the side of the ramekins.

6. Cover loosely and bake for about 25 to 30 minutes.

The four ramekins out of the oven and cooled. Afterwards, the individual ramekins were wrapped in cling film and refrigerated.


The burnt part of burnt cream.
Before serving, sugar was sprinkled sugar atop the custard.
The image shows Sugar in the Raw(TM)(aka turbinado sugar).


The torch was used to melt, slightly caramelize the sugar to form a crunchy topping.


For the sugar topping, I tried granulated sugar about 1/2 to 1 tsp. The topping didn't seem to harden up properly. Shawn suggested using turbinado sugar. At the local Starbucks, I picked up a couple packets of Sugar in the Raw (TM). Don't worry I didn't steal the packets. Being a shareholder, I'm part owner so the packets are complimentary. lol.

The final dessert turned out well. Silky smooth vanilla flavored custard. The turbinado sugar did the trick for the crunchy crust.

Of course, I can't leave well enough alone.
My next try I plan to use heavy cream and use a vanilla bean instead of vanilla extract.

Wednesday, June 11, 2008

Jun 11: Rib Tips

Last night, I cut the rib ends trimmed from the spare rib slab into bite size morsels.
The rib tips were mainly meat with a little cartilage from the sternum.

The marinade was the leftover vinegary bbq sauce, about 1 cup, plus 1/2 cup a commercial bbq sauce.

Marinade the night before...


This morning
I poured everything into the Crock Pot, set to low and went to work.

10 hours later... I got home.

Blanched some Nappa Cabbage.
Sliced a Fuji Apple and made a light slaw.
1T Mayo, A dash of red wine vinegar, salt, pepper and a pinch of dill.

Served with a buttered pieced of multi-grain toast.


I didn't expect to be at work so long... so after 10 hours in the crock pot the rib meat was a little dry and the texture gritty. Bummer.

I didn't think to add garlic to the crock or any other herbs and spices. I'll have to work on this dish some more.

Tuesday, June 10, 2008

Jun 10: Campfire Cooking

After the smoked spare ribs hit the oven, the coals were still very hot.

I decided to cook hot dogs on a stick like the good ol' days while camping... Not that I ever camped. lol!

My neat idea was to suspend the hot dog over the coals.


Clamped in place with the cooking grate.


The one problem was difficulty rotating the hot dogs. One side was getting nice and toasty while the other side looked the same.

With a lot of maneuvering, coal shoveling and knuckle hair burning, I pulled the hot dogs out and just held them over the coals.
Yum! Meat on a stick.


To bad I didn't have any fixins' for s'mores.

Sunday, June 8, 2008

Jun 8 Barbecued Spare Ribs

Cooking day!

Starting the charcoal
The Cowboy brand lump charcoal was purchased 3 years ago and is mainly small pieces of scrap wood, too small to really do much. However, I found they light pretty easily and are great in the bottom of the chimney starter.

With a few pieces of lump charcoal on the bottom, I fill the rest of the chimney starter with briquettes. Big bags purchased at Costco. Too bad I didn't buy stock in Costco, I've seem to mention Costco a lot and go there quite often.


While the coals are lighting, I prepared two hickory wood packets used to generate the smoke.
Many websites and food shows recommend soaking the wood before throwing them directly on the coals. I found this method generates too much smoke at once and supposedly creates more carcinogens.

A handful of hickory chips.


Wrap the chips in heavy duty foil and puncture the pouch with a toothpick. Wrapping the wood chips prevents the chips from burning, since you're depriving the oxygen, and the small hole allows the flavoring smoke to escape a little at a time. Besides, the wood chips will probably poke out at places in the pack creating more smoke, as in the bottom left of this pack.


Two slabs of ribs in a newly purchased rack. The rack allows more ribs to be cooked at once.


Once the coals are ready, I dumped them into the firebox and allowed the smoker to come up to 250F.

When the smoker is at 250F, the ribs were placed in the cooking compartment.
Ribs were basted and the rack rotated every 20 minutes.
I try to maintain a temperature between 200F and 250F. I found just placing two or three lit briquettes in the cooking compartment helps.


The wood chip packet placed on the coals.
Note the coals are to the side of the ribs in a separate compartment, indirect cooking.
After the first hour, the second hickory pack was used. The chips from the first pack have converted to charcoal so I just dumped those spent wood chips onto the coals.


I started kind of late and was cutting it close to the start of the party.
Ideally, the ribs would smoke/cook for 4 to 5 hours.

This is how the ribs looked at 2.5 hours into cooking.
Next, I gave the ribs a final baste and moved the ribs into a 325F oven for about 45 minutes.
The aroma was mouth watering. The smell of the hickory smoke and the seasonings were enticing.


The ribs out of the oven. Seeing the dark edges around the ribs, I was kind of worried that I dried out the ribs.


However, the ribs sliced very nicely and a quality control taste eased my concern about burnt, dry chewy ribs. The ribs had smoky, savory flavor.
Texture was nice - tender not mushy.
Note: The pink you see in the ribs is not raw meat. This is due to the smoking, known as a smoke ring.

Personally, I like to eat ribs dry (no sauce) especially when they have a lot of flavor. If I do use sauce, I lean towards a vinegary sauce. Most commercial brands just seem too sweet to me.


Recipes:
Basting Sauce - used while the ribs were smoking.
1 C Cider Vinegar
3/4 C Oil
1/4 C Worcestershire Sauce
4 T Butter
3 Cloves
2 cloves Garlic, mashed
1/2 Onion, sliced
1T Mustard, Yellow Prepared
1 Lemon, sliced

Add everything to a sauce pan and let heat about 10 minutes.


Barbecue Sauce - a vinegary sauce used as a condiment.
1.5 Cups of Tomato Sauce (Sauce I made a few days ago)
1 Cup Cider Vinegar
1/2 Onion, Chopped
2 Cloves Garlic
3 Cloves
1T Worcestershire Sauce
1 T Prepared Mustard
1/4 C Apple Juice

Heat and cook to reduce/thicken.
As I was tasting, I eventually add 1 T molasses, 1 T brown sugar and 1/2 t of sambal chili sauce.

Yesterday's Prep Work

Barbecue Links:
Garry's BBQ Pit - the basis of my basting sauce (mop) and my bbq sauce
Barbecue Institute - recipes and bbq cooking class which was fun and informative.
Virtual Weber Bullet - smoking tips and recipes

Saturday, June 7, 2008

Jun 7 Barbecue Prep - Spare Ribs

A neighbor is having a going away party for an international student they are hosting.

Growing up in California, barbecue and grilling are used synonymously. Both use coals to cook food, right? However, as I learned in my adventures in meat cookery, they have two different meanings.

Barbecue uses the concept of cooking proteins "low and slow". Low indirect heat applied over a matters of hours. Indirect heat just means that coals are off to the side of the meat being cooked.
Grilling implies cooking with high direct heat. Cooking times are usually under an hour with the meat directly over the coals.

My contribution to the party is barbecued spare ribs. With all the rainy weather, I've been getting antsy to use my smoker/grill.

A slab of spare ribs.
Note the crease below the first 5 rib bones on the left side of the slab.


My intent is to trim the ribs St. Louis Style.
Below the crease is the sternum (mainly cartilage) that runs perpendicular to the ribs.
When you trim the ribs, you cut off the sternum cartilage, plus you try to square off the slab.

Cut and try to run parallel to the end of the ribs.


The next step is to remove the then membrane covering the ribs. You can slip the tip of the knife under the membrane to create an gap. Afterwards you use your finger to enlarge the opening and work to the end. Afterwards, you can use a paper towel (get get a good grip) and peel the membrane off the ribs. Trim off any large chunks of fat and membrane from the rest of the backside.


(Optional) Flipped the ribs over. The ribs are a uniform thickness. However, there's usually an extra portion of meat (on the left end of this photo). I usually don't trim it off, but for today I did.


The extra portion trimmed off. The fat and membrane was trimmed off the ribs.


The spare ribs trimmed St. Louis Style.
Note the clean line of of pork running diagonally about mid-slab.
This is a little flap of meat that some people trim. I left it on.
Also, note the right end of the rib was trimmed to square off the slab.


The ribs were seasoned an allowed to sit overnight.
A light coating of mustard.
A light coating of Susie-Q.
A light coating of Louisiana seasoning.
Note: When I used a chili based dry rub, I apply a much heavier coating. With Susie-Q, it contains msg and salt, so I go much lighter on the salt based seasonings. I'm not making salt pork... lol


Tomorrow - Cooking Day!

Wednesday, June 4, 2008

Jun 4: Inside a George Foreman Grill

The view inside the upper plate cooking plate of the George Foreman Grill (GFG).


The strain relief wrap around the power cord - a high sprung stainless spring that's actually bolted into the cooking plate. A pretty good detail. It prevents the strain relief wrap from traveling down the power cord after repeated opening and closing of the plates.

The indicator light usually turns on when the element is energizing. Surprisingly, it's a neon lamp instead of an LED.

Single Heating element and a Casted Upper Cooking Plate.


How are we able to see the inner workings of a George Foreman Grill?

Well, here's how it went down.
I come home from work and the dogs are quiet. No barking and no greeting at the door. Hmmm... That means one thing. They got into something.

I look at the boys and they're hunkered down in the bed. DD is shaking. He's always acts guilty and knows that someone (DDD) did a bad thing.

Just like last time... I see the GFG in the middle of the carpet. This time the top plastic housing is missing.

Looks like DDD jumped up on the counter and knocked it off, thus breaking the housing. DDD is the only one that can jump that high.

No chew marks on the housing so the dang dogs didn't tear off the housing. However, they probably licked the inside clean since the housing was in another part of the house.


Glossary:
DD Dang Dog, the younger dog
DDD Dang Dirty Dog, the older dog
GFG George Foreman Grill

Monday, June 2, 2008

Jun 2: Simple Tomato Sauce

Craving of the day: Spaghetti

I've been fortunate to work with engineers from Italy. The country where European high cuisine originated. One engineer I worked with was quite, unintentionally, humorous about his dislike for the food in the US. Apparently, food here is over-seasoned to the point you can't taste what the main ingredient. The Italian food here has too much garlic. If you're familiar with Emeril's show, you'll know what I mean.

As an example, he described how his coworkers would cook mussels. A little wine, parsley, salt and that's it. I asked about adding garlic and got an emphatic, "No." Garlic would overpower the mussels.

At the same time, I read this Simple Tomato Sauce recipe from Bob del Grosso's blog A Hunger Artist.

What caught my attention was the simplicity of the recipe - tomatoes, garlic, basil, olive oil, salt and pepper. Also, it was quick about 15 mintutes, including prep time. This jived with my Italian cowoker was saying.

Salsa di Pomodoro

The Fixins'
2 pounds Tomatoes - 12 hot house tomatoes - cut into 12ths.
3 cloves Garlic - sliced
2 Oz Olive Oil
6 leaves Basil
Salt and Pepper to taste

The main ingredients - tomatoes, basil and garlic.


The olive oil is heated in the pan.
Add the garlic to cook about a minute or two, but not brown.
Add the tomatoes, bring to a simmer and let cook for 10 minutes.
Afterwards, add the salt, pepper and basil.

Basil added to the cooked tomatoes.


Blend the sauce - another reason to use a gadget! I used a stick blender.


The Final Dish
Serve sauce over pasta. Also, topped with Parmesan cheese.


I enjoyed the sauce.

Nice strong taste of fresh basil and the garlic was present but more subtle. I thought the garlic would be completely diluted out by all of the the tomato. That was not the case.

This recipes is very simple and does not have heavy seasonings to mask the main ingredients. The tomatoes I used were not quite ripe so the tomato's contribution was a bit subdued.

The hot house tomatoes used looked nice and deep red in the supermarket, but when I started cutting the tomatoes the center were still firm. Just two or three days short of being fully ripe, but I was craving pasta and didn't want to wait. Also, while I was in the market I forgot to buy some canned tomatoes as backup.

This would make a great recipe for fresh ripe tomatoes.