Challenge number three for me.
Hey! I'm a poet and I didn't even…
realize it. lol! :P
This month's challenge is hosted by Alternative (Gluten-Free and Vegan) Daring Bakers: Natalie who blogs at Gluten A Go Go and Shel who blogs at Musings From the Fishbowl.
After last month’s difficulties with the eclairs, this month's challenge is a straight-forward yeast bread challenge. Alright! Yeast breads is something I’m familiar with! I may not be the definitive expert, but at least I’ve made yeast breads and have a feel for kneading dough.
The twists (dough humor?) for this month's challenge is that we select a vegan option or a gluten-free option. Also, we use our imaginations for the toppings and make accompaniements that are gluten-free and vegan-friendly.
The trick is roll the dough as thin as possible to develop the crispy crunchy cracker. However, if you don’t roll thinly, you end up with a pita-like flat bread… so it’s a win-win situation.
The following is the description of the challenge. I chose the vegan option, so the description has been edited to show only the vegan bread flour version I made. If you’re interested in the gluten-free version, please feel free to see Natelie’s link above.
**** The Challenge *****
Make Lavash Crackers and create a dip/spread/salsa/relish to accompany it. This challenge allows for large helpings of creativity and personality, with the crackers, your flavor choices for the crackers, and with your dip/spread choice. You can create your own dip/spread recipe, use one of your favorites, or use one of the recipes we’ve provided at the bottom of this post. Get crazy ! Just be sure to post the recipe along with your challenge crackers so we can see what you made and how you made it (so we can try it, too!).
The Definitions:
Vegan - no animal products of any kind (http://en.wikipedia.org/wiki/Veganism)
Gluten Free - No wheat (including kamut and spelt), barley, rye, and triticale, as well as the use of gluten as a food additive in the form of a flavoring, stabilizing or thickening agent. For the purposes of this challenge, we are also excluding oats, even though there are gluten free oats available in some parts of the world. (http://en.wikipedia.org/wiki/Gluten_free)
Heads Up :
* You can do so much to make this recipe your own – adding dried herbs or roasted garilic, etc., to the dough, using gourmet spices-salts-seasonings-seeds to sprinkle on top, etc.
* Read carefully ! The following recipe includes directions for both gluten-free crackers (à la Natalie !) and traditional AP flour crackers.
* The key to crispy crackers is rolling out the dough as thinly as possible. We noticed that the crackers turned out better if you divide the dough in half before rolling. You’ll roll out the dough as per the directions, decorate and cook the crackers in two batches.
* We’ve included some links with examples of the finished Lavash at the bottom of the post. J
RECIPE - Recipe Reference: The Bread Baker's Apprentice: Mastering The Art of Extraordinary Bread, by Peter Reinhart. Ten Speed Press, Berkeley, CA. Copyright 2001. ISBN-10: 1-58008-268-8, ISBN-13: 978-158008-268-6.
Here's a simple formula for making snappy Armenian-style crackers, perfect for breadbaskets, company and kids...It is similar to the many other Middle Eastern and Northern African flatbreads known by different names, such as mankoush or mannaeesh (Lebanese), barbari (Iranian), khoubiz or khobz (Arabian), aiysh (Egyptian), kesret and mella (Tunisian), pide or pita (Turkish), and pideh (Armenian). The main difference between these breads is either how thick or thin the dough is rolled out, or the type of oven in which they are baked (or on which they are baked, as many of these breads are cooked on stones or red-hot pans with a convex surface)...
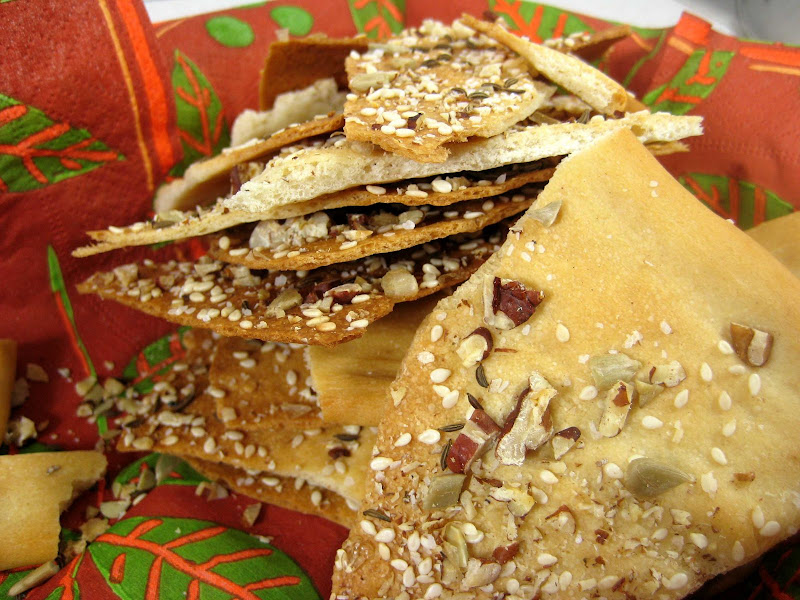
The key to a crisp lavash,...is to roll out the dough paper-thin. The sheet can be cut into crackers in advance or snapped into shards after baking. The shards make a nice presentation when arranged in baskets.
Makes 1 sheet pan of crackers
* 1 1/2 cups (6.75 oz) unbleached bread
* 1/2 tsp (.13 oz) salt
* 1/2 tsp (.055 oz) instant yeast
* 1 Tb (.75 oz) agave syrup or sugar
* 1 Tb (.5 oz) vegetable oil
* 1/3 to 1/2 cup + 2 Tb (3 to 4 oz) water, at room temperature
* Poppy seeds, sesame seeds, paprika, cumin seeds, caraway seeds, or kosher salt for toppings
1. In a mixing bowl, stir together the flour, salt yeast, agave, oil, and just enough water to bring everything together into a ball. You may not need the full 1/2 cup + 2 Tb of water, but be prepared to use it all if needed.
I was surprised to find out that granulated sugar, mainly cane sugar, may not be vegan. Apparently, cane sugar is made via a two-step process. One of the steps calls for filtering the sugar (syrup?) through activated charcoal. One source of making activated charcoal is using animal bones. Beet sugar does not require this step. However, most brands of sugar can be either cane or beet sugar. I wanted to keep in the spirit of the challenge so I opted out of using sugar.
I recently purchased some palm sugar. Having never used or tasted palm sugar, this would be a good time to give it a try.
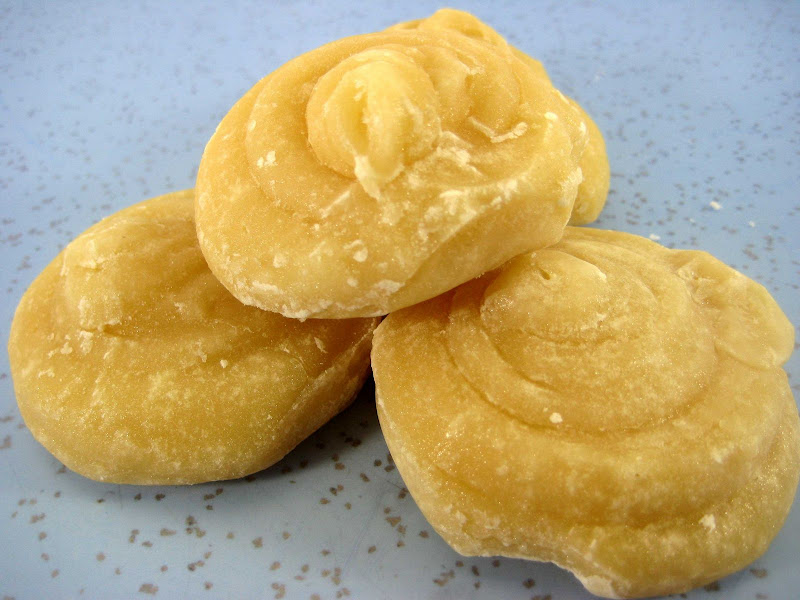
The palm sugar must have some inherent moisture. Instead of cracking during slicing, the palm sugar sliced into thin sheets
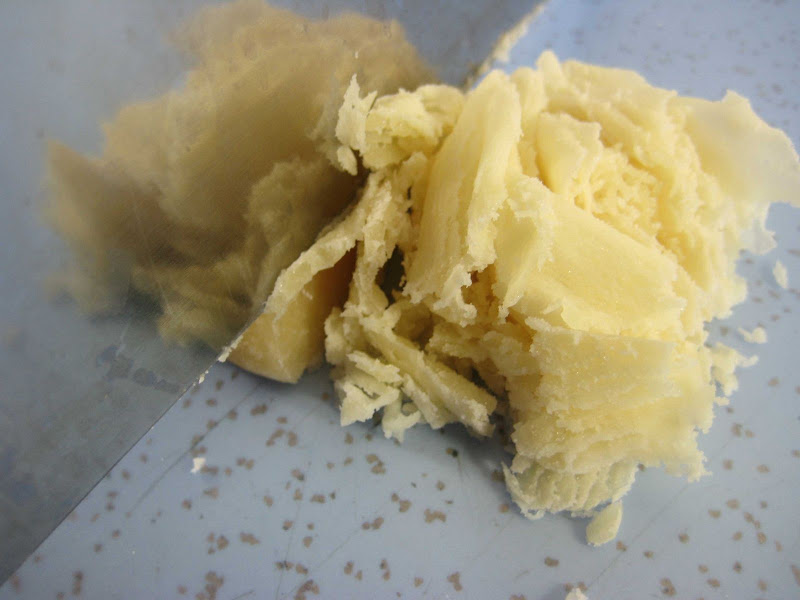
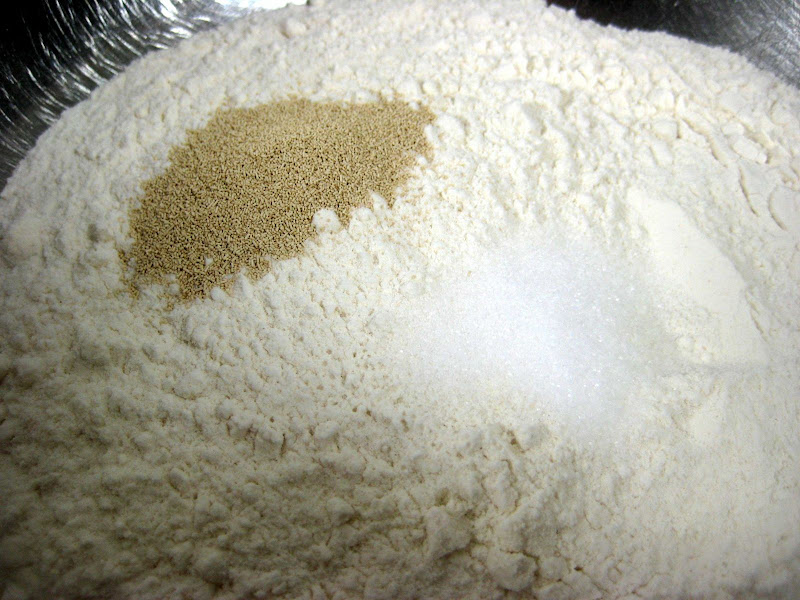
Yeast and salt in the flour – blend before adding the liquids
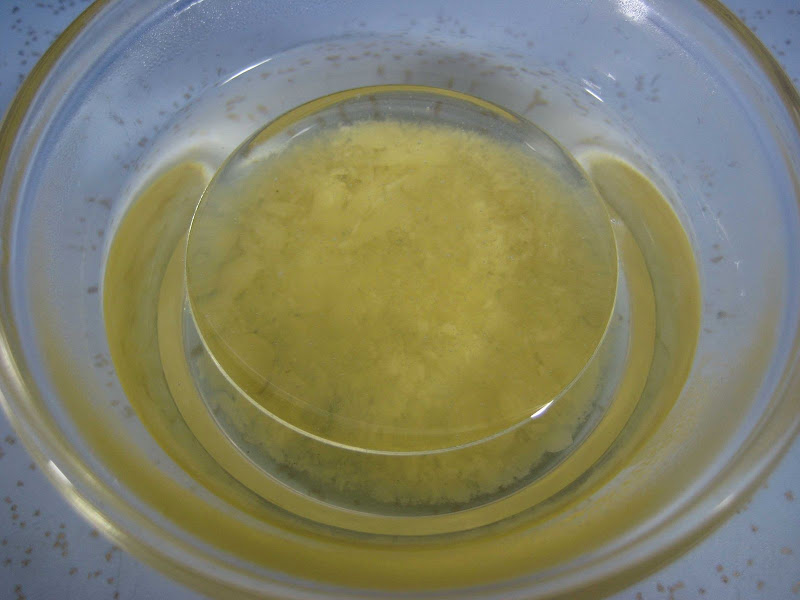
The palm sugar was added to 1/3 C water and 1 T oil. I figured melting the sugar would help distribute the sugar in the dough more evenly.
Added the 1/3 C water + 2 T additional water until the flour formed a ball. I was debating with myself about adding another 1 T (Tablespoon of water), but this was close enough.
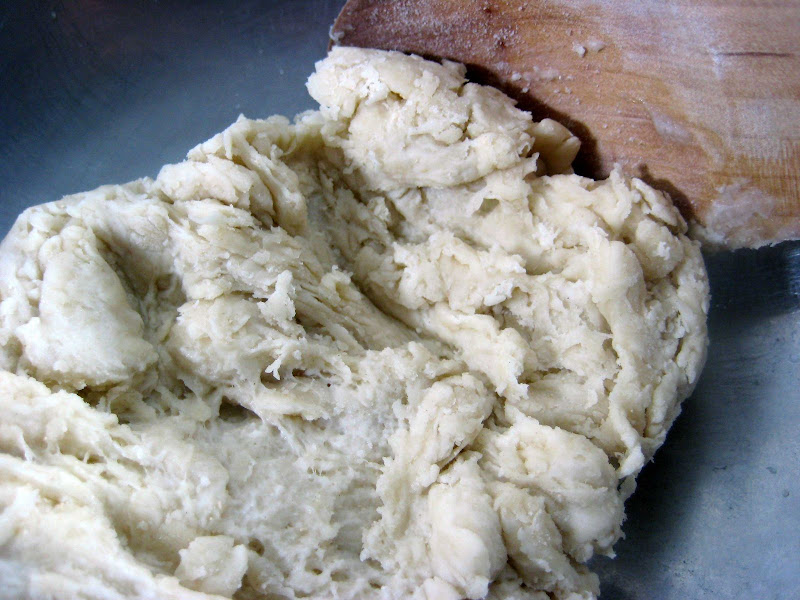
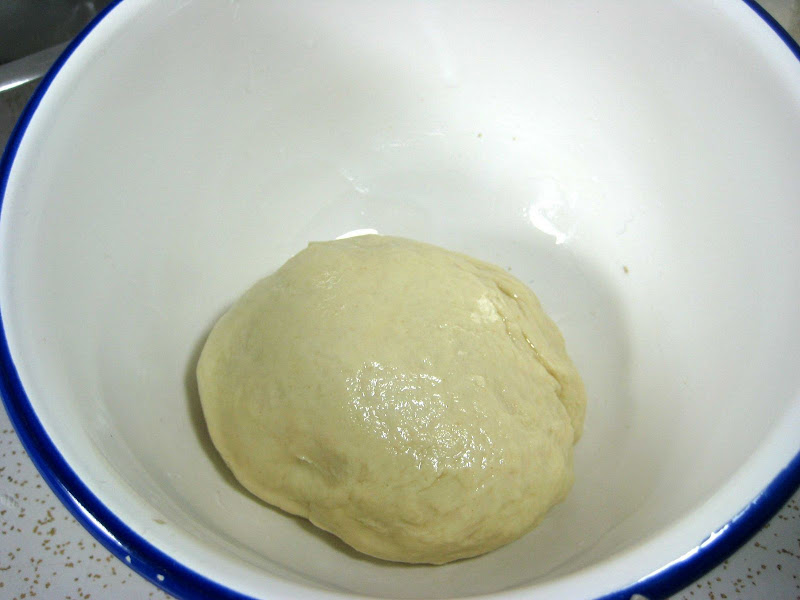
2. Sprinkle some flour on the counter and transfer the dough to the counter. Knead for about 10 minutes, or until the ingredients are evenly distributed. The dough should pass the windowpane test and register 77 degrees to 81 degrees Fahrenheit. The dough should be firmer than French bread dough, but not quite as firm as bagel dough (what I call medium-firm dough), satiny to the touch, not tacky, and supple enough to stretch when pulled. Lightly oil a bowl and transfer the dough to the bowl, rolling it around to coat it with oil. Cover the bowl with plastic wrap.
The next three pictures illustrate how I hand knead dough.
Roll the dough over on itself. I use my finger tips and roll the dough up 1/3rd.
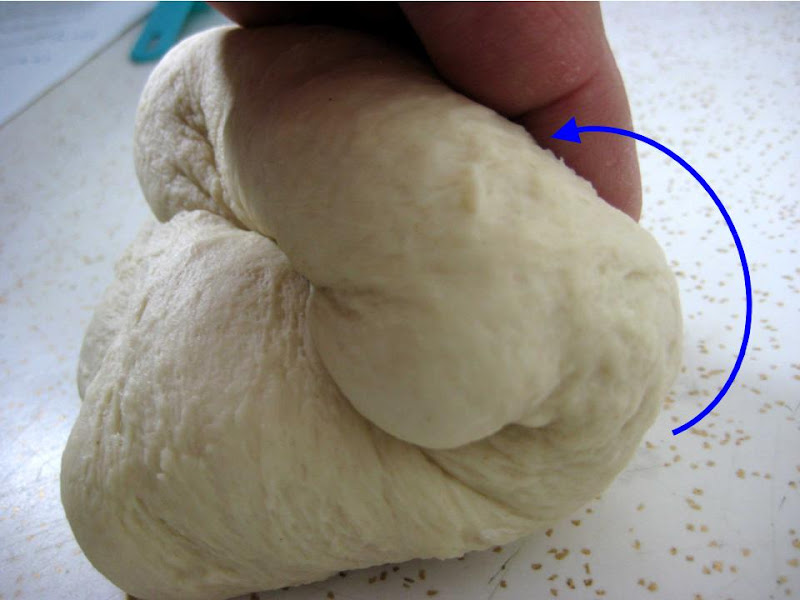
Next, I smash with the heel of my palm. The motion is similar to CPR. You bend at the waist and push down. No need to pump with your arm. You'll just tire yourself out a lot faster. Repeat about three times... the rolling and smashing.

After you need one side, you rotate the dough 90 degrees so the long side is now pointing towards you. Repeat the rolling and smashing for about 10 to 15 minutes.

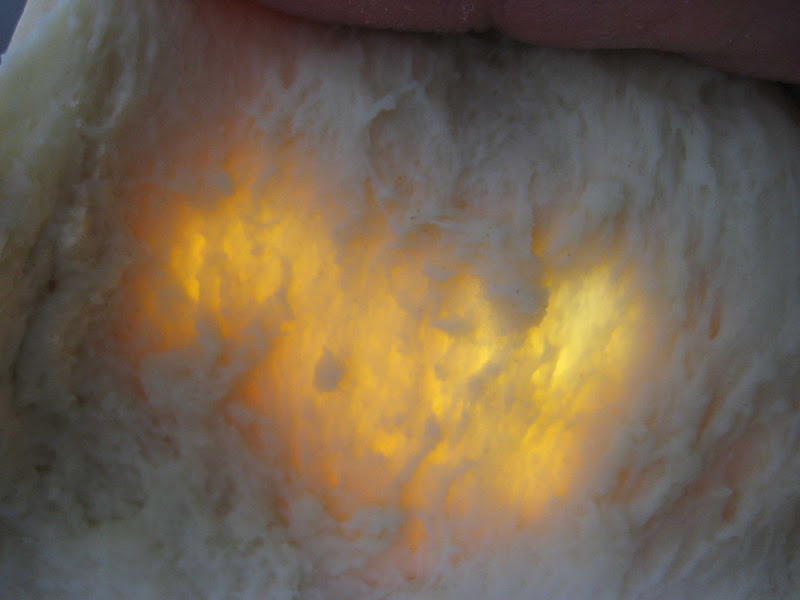
How do you know you're done kneading? When you can strech the dough out thinly without tearing and you can see light shining through. This is known as the "window pane" test.
3. Ferment at room temperature for 90 minutes, or until the dough doubles in size. (You can also retard the dough overnight in the refrigerator immediately after kneading or mixing).
Place dough in a lightly oiled bowl, roll the dough ball around the bowl to coat the ball. Cover with plastic wrap.
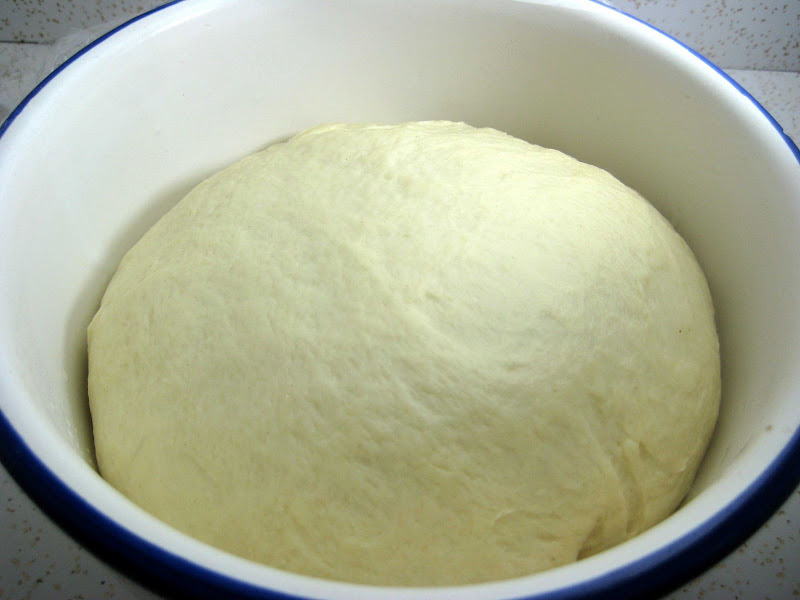
After a few hours, definitely a doubling and more!
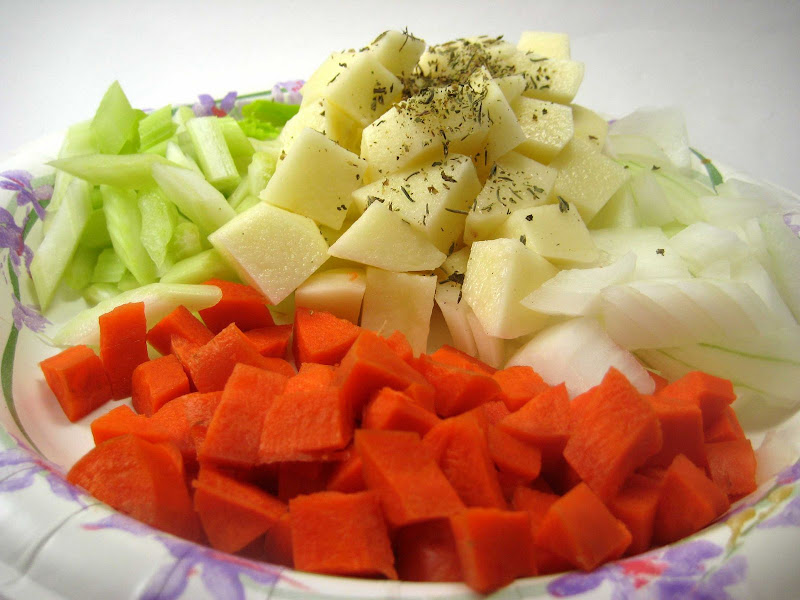
The dough was divided in half so I could make the basic recipe and a variation.
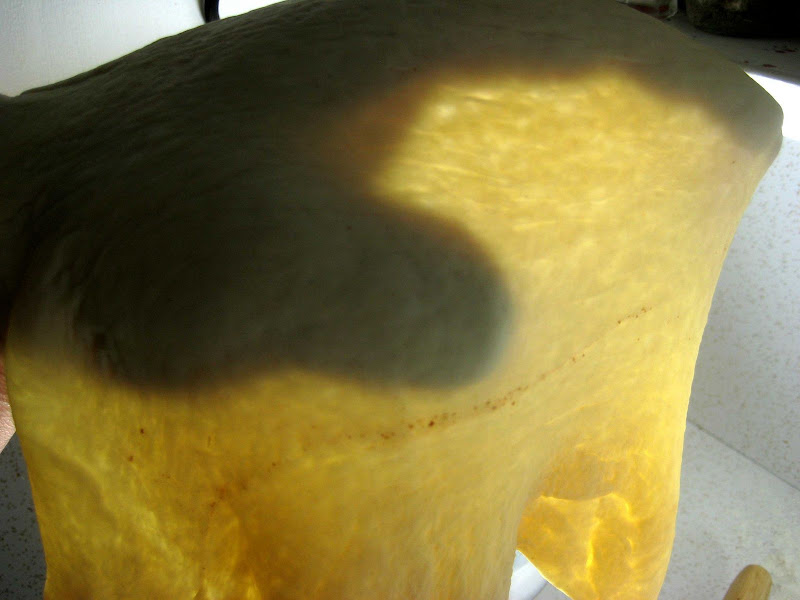
4. Mist the counter lightly with spray oil and transfer the dough to the counter. Press the dough into a square with your hand and dust the top of the dough lightly with flour. Roll it out with a rolling pin into a paper thin sheet about 15 inches by 12 inches. You may have to stop from time to time so that the gluten can relax. At these times, lift the dough from the counter and wave it a little, and then lay it back down. Cover it with a towel or plastic wrap while it relaxes. When it is the desired thinness, let the dough relax for 5 minutes. Line a sheet pan with baking parchment. Carefully lift the sheet of dough and lay it on the parchment. If it overlaps the edge of the pan, snip off the excess with scissors.
The dough has been rolled and being transferring onto the parchment paper. So far so good… seems thin enough.
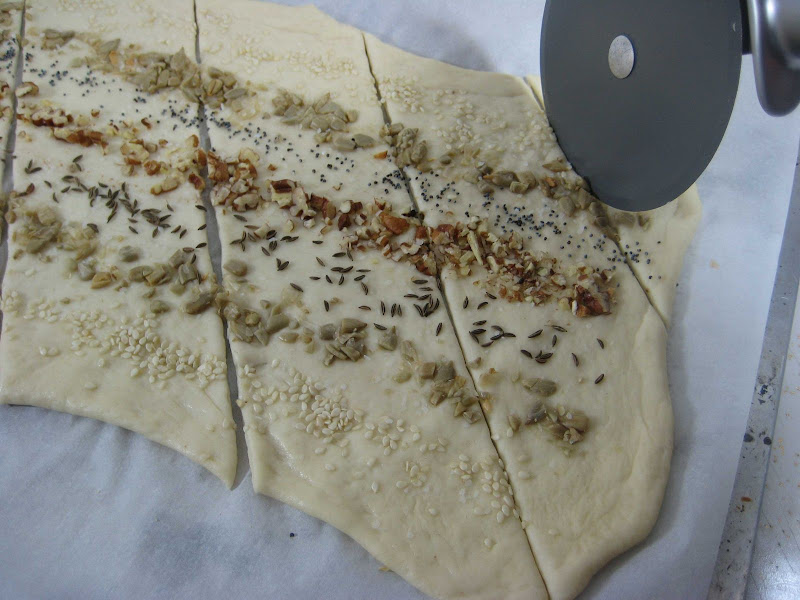
5. Preheat the oven to 350 degrees Fahrenheit with the oven rack on the middle shelf. Mist the top of the dough with water and sprinkle a covering of seeds or spices on the dough (such as alternating rows of poppy seeds, sesame seeds, paprika, cumin seeds, caraway seeds, kosher or pretzel salt, etc.) Be careful with spices and salt - a little goes a long way. If you want to precut the cracker, use a pizza cutter (rolling blade) and cut diamonds or rectangles in the dough. You do not need to separate the pieces, as they will snap apart after baking. If you want to make shards, bake the sheet of dough without cutting it first.
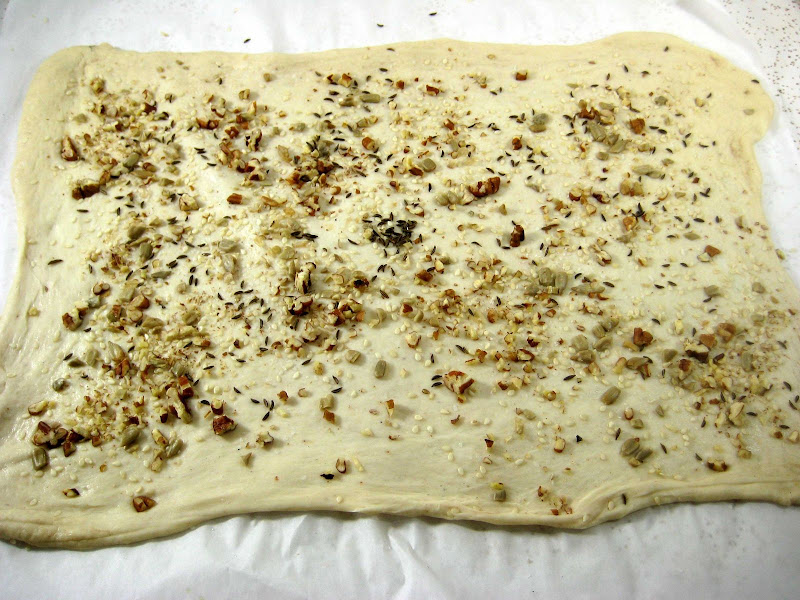
Added the seeds (from left to right – Sesame, sunflower, caraway, pecan, poppy, sunflower and sesame. Also, sprinkled a 1/ 2 t Kosher salt) and pre-slicing the dough before baking.
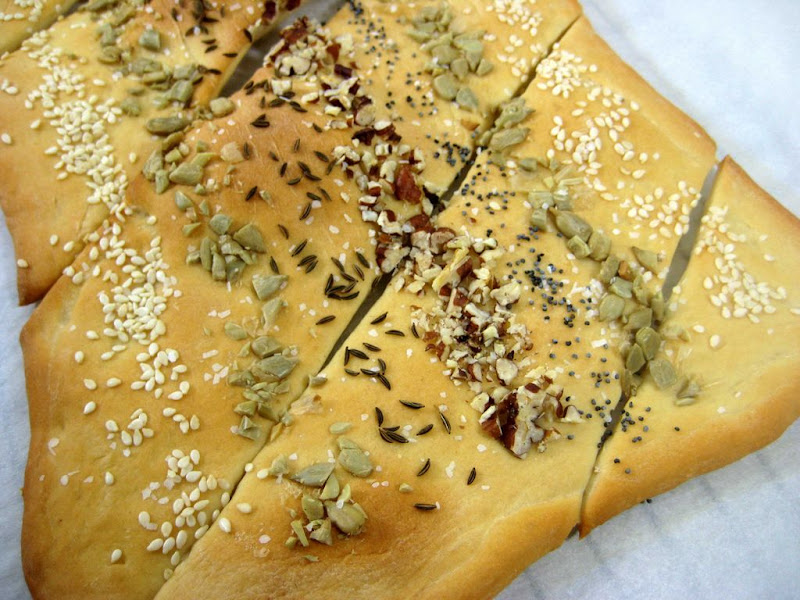
6. Bake for 15 to 20 minutes, or until the crackers begin to brown evenly across the top (the time will depend on how thinly and evenly you rolled the dough).
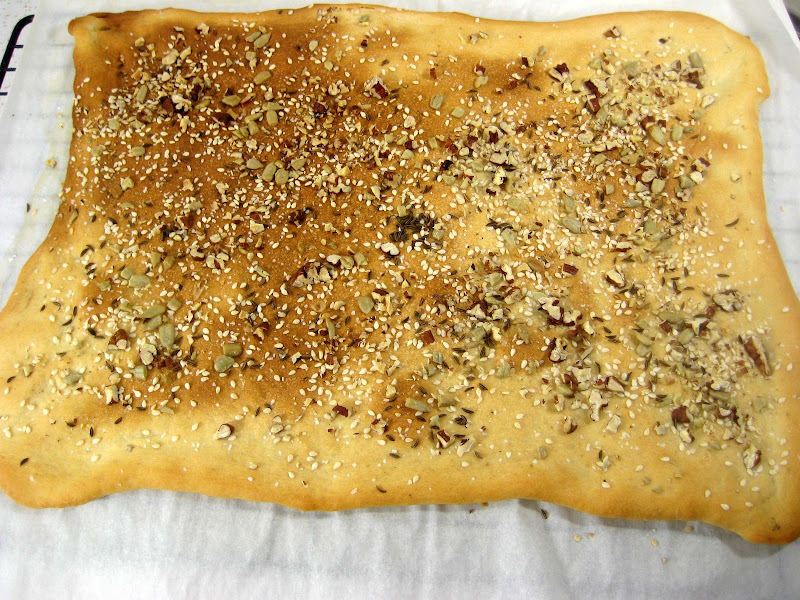
Right out of the oven and onto a cooling rack. Baking time was about 15 minutes.
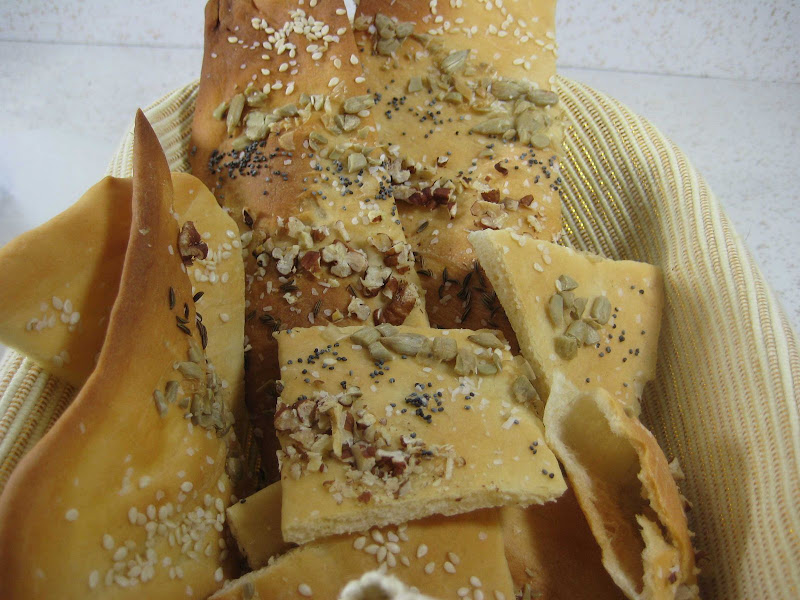
7. When the crackers are baked, remove the pan from the oven and let them cool in the pan for about 10 minutes. You can then snap them apart or snap off shards and serve.
Variation: Asian flavors
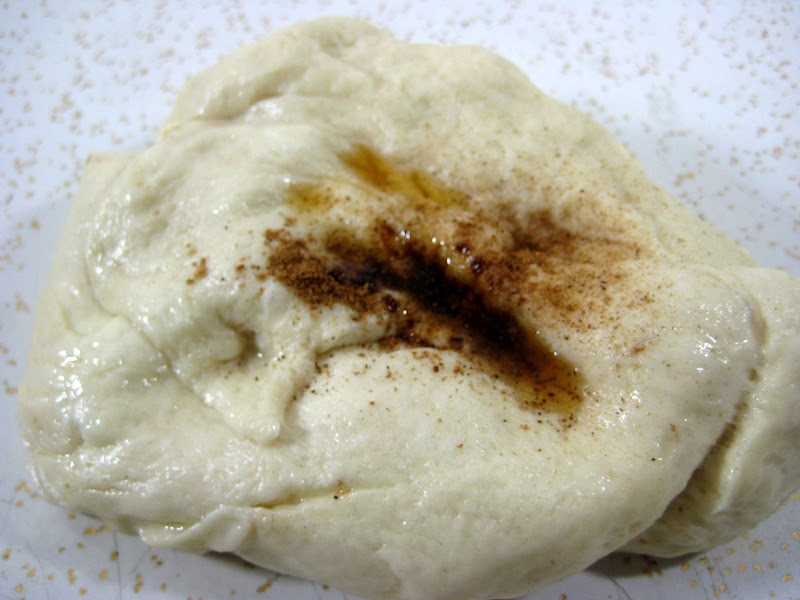
With the other half of the dough, I added a little (1/4 t) Chinese 5-Spice powder. With 5 spice, a little goes a long way. Also, added a few drops of toasted sesame seed oil.
The dough was kneaded again to incorporate the flavors. The dough was allowed to rise again.
I was more patient with rolling out the lavash this time. If the dough shrank while I was rolling, I let the dough rest 5 to 10 minutes before rolling again. This time the dough ball rolled out thinner and larger. Also, the topping was applied free form. No pre-slicing.
Baked out a lit thinner and crispier. Baking time was about 15 minutes.
Tried breaking into shards by hand, but the bits ended up looking sloppy. I like the pre-slicing method better.
Toppings:
For my toppings, I experimented around.
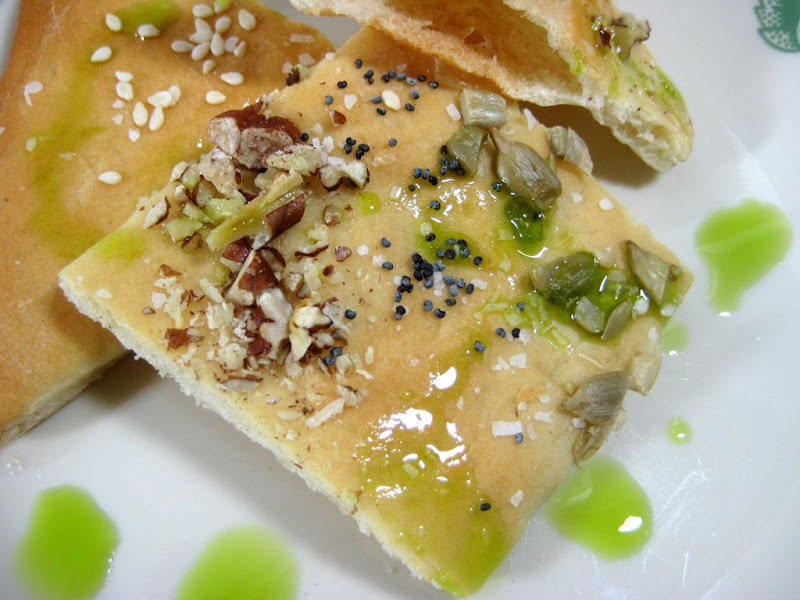
For the basic lavash, I used chive oil - since I like the taste of chives.
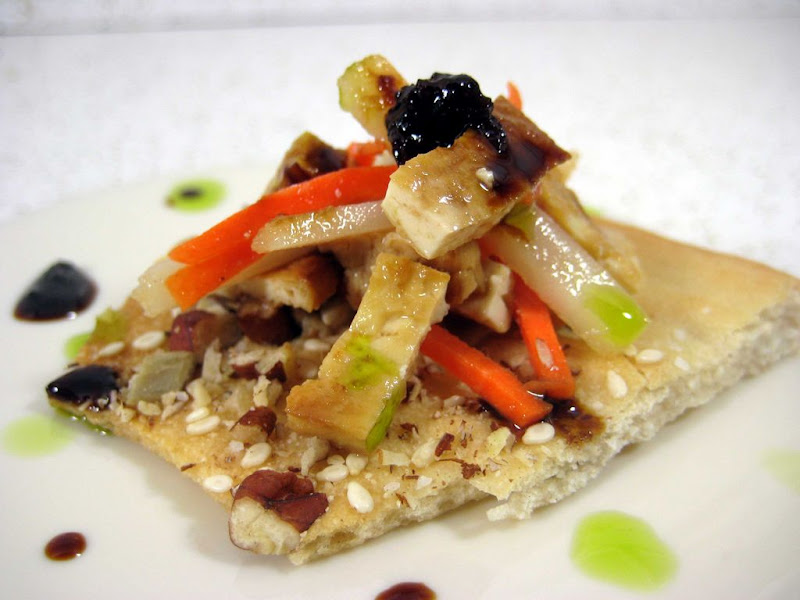
For Asian style lavash, a garlic-ginger-scallion-soy syrup and a fried tofu-carrot-waterchestnut salad. Say that 10x fast. lol!
Chive oil
5 or 6 ounces (about 2 cups) Garlic Chives, cut into 1 to 2 inch lengths
1/2 C Olive oil
1/2 C Vegetable oil (Soybean oil)
11/2 tsp Kosher salt
1. Blanch the cut chives in boiling water for about 10 seconds... drain on a towel. Squeeze out extra moisture as needed.
2. Add the blanched chives, oils and salt into a blend and blend into a smooth puree.
3. The mixture will be frothy from blending so let sit for an hour or two before straining. I used a paper towel to strain since I didn't have a coffee filter or cheesecloth.
Basic Lavash drizzled with chive oil.
Tofu Topping
The Topping
1/2 C fried Tofu (marinaded in tamari, toasted sesame oil and garlic powder)
2 T Waterchestnut, julienned
2 T Carrot, julienned
Lime Juice
Toasted sesame seed oil
Mix all the ingredients... season to taste.
I purposely kept the tofu topping lightly seasoned since I was adding a reduction on top.
Soy Ginger Garlic Reduction
4T Tamari (Wheat-free)
2T Green onions, minced
1t Ginger, minced
1 clove Garlic, minced
Lime Juice (1 lime about 2T)
Lightly saute the garlic, green onion, ginger.
Add the lime juice and the soy sauce... mix and gently reduce the mixture.
Asian inspired lavash topped with the tofu salad. Drizzled with a soy-garlic reduction and chive oil.