Showing posts with label cream. Show all posts

Sunday, November 29, 2009

Nov 29: Panna Cotta

I was watching the TV show Top Chef where one of the cheftestants was eliminated for making a terrible panna cotta. The comments from the judges was that it's a very easy dessert and difficult to foul up.

What is panna cotta and what makes it easy?

Looking up a couple recipes...
The Perfect Panna Cotta by David Lebovitz
Panna Cotta on the Joy of Baking website.

Panna cotta is a dessert that's basically cream, sugar, gelatin and vanilla. Hmmm... That's all? That is very straightforward. In fact, add almond extract you'll make "Almond Floats" which is that white almond flavored gelatin served with fruit cocktail... often found in Chinese restaurants.

Based upon the recipes above, I backed out a very basic Panna Cotta recipe.

Panna Cotta
1 C Heavy Cream... That's all I had.
1 C Half and Half
1/4 C (50 g) Sugar
1/2 t Vanilla Extract
1/4 C Water
1 Envelope Unflavored Gelatine, powdered.

1. Grease custard cups with a mild oil or unsalted butter. I used vegetable oil.

2. Heat the dairy and the sugar until the sugar dissolves.


3. Bloom the gelatine in the 1/4 C of water for about 5 to 10 minutes.


4. Add the vanilla to the hot dairy mixture or, as I did, add to the gelatine.
The hot dairy was poured in and stirred until the gelatine was completely dissolved.


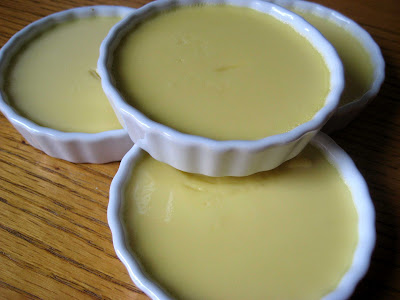
5. Pour equal amounts into a custard cup or a glass.
The custard cups are for unmolding while the glasses are meant to be part of the service.
Chill... I chilled overnight.
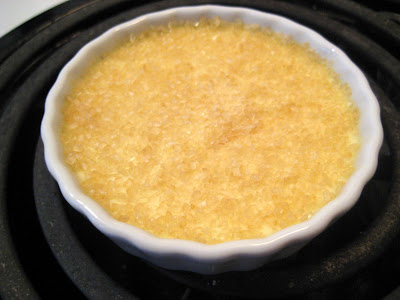


The plating...
Using a paring knife to trace the side of the custard cup, invert and unmold. Patience is required here. It's like trying to get a ketchup bottle started. Also, you can use hot water and heat the bottom of the cup. Eventually, the panna cotta will plop out.

The berries (1 C) were frozen... warmed in a small sauce pan with about (2 or 3 T sugar).
I also had some leftover ganache from my macaron making from a few days ago.


Results...
The panna cotta was very easy to make.

I wasn't sure what to expect... a firm milk jell-o like product or a smooth light custard?
Surprisingly, the panna cotta was light with a texture close to a custard, but a little firmer. However, it wasn't stiff like Jell-O.

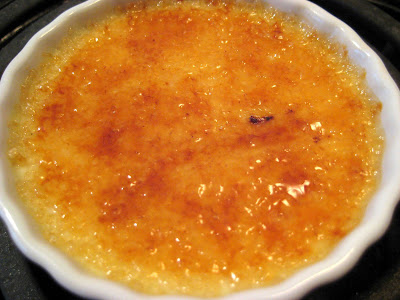
The berries and chocolate overpowered the vanilla panna cotta. Without the sauce and chocolate, I would describe the panna cotta like a firm vanilla ice cream or a firmer creme burlee without the burnt sugar topping.

Improvements?
Based upon the firmness of the panna cotta, I was thinking I could have added another 1/2 C to 1 C of dairy. My goal is to still have a gelled dessert, but one that's soft like a custard... without having to go through the steps of making a custard.

Also, maybe just a touch more vanilla 3/4 t or using a vanilla pod in the heated dairy mixture.

Overall, a very simple dessert with lots of potential.

Tuesday, September 2, 2008

Sep 02: Eclair Follow-Up (The Experiment)

This is a follow-up/continuation of the Daring Bakers Challenge - Chocolate Eclairs which I posted Sept 31st.

I was initially disappointed with the results of the eclairs. The choux did not puff the way I imagined and some deflated into ladyfingers... and this (I thought) was supposed to be the "easy" part of the challenge.

Seeking advice in the Daring Bakers Forum, the advice centered around baking times. The reason for the deflating eclairs is undercooking. Another factor that I wasn't sure of was the consistency of the choux before piping. The recipe called for "ribbons". Julia Childs recipe shows a stiffer scoopable choux while Alton Brown's choux was in-between - soft but no ribbons.

The flat eclairs bugged me so much that I decided to make the choux recipe one more time, but this time I'll experiment with baking times. I also tried another consistency of the dough and another piping tip.

The Dough
The basic recipe was the same as the challenge... the only difference was the amount of egg added to form the final choux dough.

Try #1 - followed the recipe to the letter. The final dough was smooth and free flowing, but viscous like honey or molasses.


Try #2 - I looked through a Julia Childs cookbook and the picture of the finished choux was firm and scoopable. I beat the eggs this time instead of adding whole unbeaten eggs. This dough is scoopable. I added about 4 eggs instead of 5.


Try #3 (about 2 1/2 weeks after tries #1 and #2) - I caught Alton Brown's show on choux pastry. His recommendation was the dough should form a "V" when lifted by the spoon and it should tear. Again, I added beaten the eggs... added about 4.5 eggs. The texture was sticky... like getting stuck in the mud. Note the jagged edges where the dough did tear.


The Tip
The recipe called for a 2cm tip (which is about 0.75 inches).

Try #1 - used a ziploc with a corner cut out. Note eclairs are flat to start out with and not really round.


Try #2 - I noticed the end of my water bottle had a 0.75" diameter opening so I used that as a tip in the ziploc. :-) A little dough did slip pass the end of the bag.


For Try #3 - I caved in and purchased a large piping coupler. I was actually looking in a craft store and there it was. Tip diameter is 0.75 inches. The coupler is two parts that screws together so there should be no problems with leakage.


The Baking Experiment
I decided on 6 baking times and temperatures
1. PH Method (Basic recipe) - 375F, with spoon, without spoon... 20 minutes total.
2. PH Method, no spoon - 375F no door propping, but rotated... 20 minutes total
3. PH Method With Water - Same as one except added a pan of water in the oven... 20 minutes total
4. CIA Method - 325F for 30 minutes (rotate at 15)
5. Alton Brown Method - 425F for 10 mins, rotate, 350F another 10 minutes... 20 minutes total
6. PH Method (Basic recipe) again to see if anything changed.

PH = Pierre Herme
CIA = Culinary Institute of America

Example: Experiment 3 - Water
A pan of water is placed in the oven while the oven is preheating. The water increases the humidity in the oven which is supposed to help the choux rise.

Note: I only baked 3 at a time.
From left to right:
W01 - as piped
W02 - scored with a fork (the lines are supposed to help the choux puff up like an accordion)
W03 - scored with a sharp paring knife (to see if a sharp cut into the dough would work better than the tines of a fork)


The finished results - The water bottle cap gives scale. The inner ring (dark) is 0.75 inches.
Definite puffing in this shot. Taken out of the oven. No deflating.


A top view - an increase in width too! All these sizes are about the same, but the knife slits seemed to puff the best.


These puffed the most and were baked at 425F. Makes sense. More heat gives more steam.


Comparison of all the results for Try #3.
All methods puffed really well and there was no deflating.
The water pan seemed to help with size, but the choux baked at 425F seemed to puff the most.
Using a knife to make shallow grooves seemed to help. However, using a knife to make grooves should be done on the sides so the top is thicker and uniform looking.


Try #3 - The finished eclairs. Made the chocolate pastry cream filling, but he topping this time is a ganache (because it was easier).


Conclusion - All baking methods seemed to produce good results. General rule of thumb... The hotter the oven the better.

However, I'm starting to believed dough consistency contributes a lot more to the final product size. For example, the ribbony choux produced flat eclairs (too much liquid?) while try #2 was better but still had some deflation (too little water?) and try #3 was the best. A lot of puffing and no deflation.

Sunday, June 22, 2008

Jun 22: Creme Brulee (Burnt Cream)

A few years ago I received a Creme Brulee Set as a present (Thanks Shawn!). The set contained four porcelain ramekins and a torch.

Since I'm a budding pyro, the torch was the first piece I used. However, I did not make the dessert until today.

The recipe contained in the set was very straight forward and simple.

Creme Brulee (Burnt Cream) is a silky smooth custard dessert with a crunchy sugar topping.

The Fixins'
3/4 C Heavy Cream... Today I used whipping cream.
1T + 2 tsp Sugar... For some reason, I had stuck in my mind 3/4 C sugar and measure it out... thinking that's a lot of sugar. Fortunately, I reread the recipe.
2 Egg Yolks
1/2 t vanilla

Preheat oven, 300F and boil some water - I used 1 cup.

1. Combine cream and sugar in a small saucepan over medium heat. Cook and stir occasionally to a simmer... about 5 to 6 minutes.

2. In a separate bowl, beat egg and vanilla until light.

3. Slowly add that hot cream mixture into the beaten egg to temper the eggs. Continue adding and beating the mixture.

4. In a baking pan, arrange ramekins. Pour in brulee mixture evenly into each ramekin.

5. Pour the boiling water into the baking dish so the brulees will bake in a water bath. Water should be halfway up the side of the ramekins.

6. Cover loosely and bake for about 25 to 30 minutes.

The four ramekins out of the oven and cooled. Afterwards, the individual ramekins were wrapped in cling film and refrigerated.


The burnt part of burnt cream.
Before serving, sugar was sprinkled sugar atop the custard.
The image shows Sugar in the Raw(TM)(aka turbinado sugar).


The torch was used to melt, slightly caramelize the sugar to form a crunchy topping.


For the sugar topping, I tried granulated sugar about 1/2 to 1 tsp. The topping didn't seem to harden up properly. Shawn suggested using turbinado sugar. At the local Starbucks, I picked up a couple packets of Sugar in the Raw (TM). Don't worry I didn't steal the packets. Being a shareholder, I'm part owner so the packets are complimentary. lol.

The final dessert turned out well. Silky smooth vanilla flavored custard. The turbinado sugar did the trick for the crunchy crust.

Of course, I can't leave well enough alone.
My next try I plan to use heavy cream and use a vanilla bean instead of vanilla extract.