Daring Baker's is an group of online baking enthusiast where many of have formed lasting friendships, especially amongst the original Daring Bakers. Although I didn't know her, it is obvious from the tributes on various blogs that Sherry was a friend to many in Daring Bakers and to many in the general food blogging community.
Welcome to Pizzeria Giovanni!
Pizza is one of those food groups that I've been experimenting with since college. Wow! A Daring Baker's Challenge that I'm actually familiar with!
This month's challenge is hosted by Rosa of Rosa's Yummy Yums.
THE CHALLENGE: You have to use the tossing method (as explained below) for at least 2 Pizza Crusts. If you are not comfortable with it, then you can switch to the rolling method, but you HAVE to try the traditional method and exercise it, using at least two dough pieces. You should also capture the moment by either filming or photographing yourself while tossing the dough.
THE RULES: This month’s recipe leaves you with much freedom! You can either make the Pizza Dough gluten-free or the normal way. You may use the sauce (anything liquidy, saucy and spreadable like cream cheese, flavored oils, pesto, Nutella, Peanut Butter, pumpkin puree, etc...) and toppings of your choice, may they be savory or sweet, gluten-free, vegan, vegetarian or non-vegan/vegetarian. You must use BOTH (sauce & toppings).
JUST USE YOUR IMAGINATION!!!
Before I get to the pizza dough we're using for the challenge, this is the pizza sauce I've been using since college. A roommate worked in a mom and pop pizza parlor in high school and he showed me how he made sauce - tomato sauce, diced tomatoes and tomato paste. I tried different ratios of the three basic ingredients plus adding dried herbs. The following is the sauce I ended up with...
My Basic Pizza Sauce
1 can 14.5 oz Diced Tomatoes with Basil, Onion and Oregano
1 can 8 oz Tomato Sauce
1 to 2 T Tomato Paste
1 Clove Garlic, minced
1/3 t Basil, Dried
1/3 t Oregano, Dried
1 T Olive Oil
Heat olive oil and minced garlic to release flavors.
Pour in tomatoes and tomato sauce.
Add the dried herbs and let simmer about 5 to 10 minutes.
Puree using a stick blender.
Add tomato paste to thicken the sauce... Simmer another 5 minutes.
Let Cool before using.
RECIPE SOURCE: “The Bread Baker's Apprentice: Mastering The Art of Extraordinary Bread” by Peter Reinhart. Ten Speed Press, Berkeley, CA. Copyright 2001. ISBN-10: 1-58008-268-8, ISBN-13: 978-158008-268-6.
~ BASIC PIZZA DOUGH ~
Makes 6 pizza crusts (about 9-12 inches/23-30 cm in diameter). *
Ingredients:
4 1/2 Cups (20 1/4 ounces/607.5 g) Unbleached high-gluten (%14) bread flour or all purpose flour, chilled
1 3/4 Tsp Salt
1 Tsp Instant yeast
1/4 Cup (2 ounces/60g) Olive oil or vegetable oil (both optional, but it’s better with)
1 3/4 Cups (14 ounces/420g or 420ml) Water, ice cold (40° F/4.5° C)
1 Tb sugar
Semolina/durum flour or cornmeal for dusting
*Note: I halved the recipe to make 3 pizza crusts.
DAY ONE
Method:
1. Mix together the flour, salt and instant yeast in a big bowl (or in the bowl of your stand mixer).
2. Add the oil, sugar and cold water and mix well (with the help of a large wooden spoon or with the paddle attachment, on low speed) in order to form a sticky ball of dough. On a clean surface, knead for about 5-7 minutes, until the dough is smooth and the ingredients are homogeneously distributed. If it is too wet, add a little flour (not too much, though) and if it is too dry add 1 or 2 teaspoons extra water.
NOTE: If you are using an electric mixer, switch to the dough hook and mix on medium speed for the same amount of time.The dough should clear the sides of the bowl but stick to the bottom of the bowl. If the dough is too wet, sprinkle in a little more flour, so that it clears the sides. If, on the contrary, it clears the bottom of the bowl, dribble in a teaspoon or two of cold water.
The finished dough should be springy, elastic, and sticky, not just tacky, and register 50°-55° F/10°-13° C.
3. Flour a work surface or counter. Line a jelly pan with baking paper/parchment. Lightly oil the paper.
4. With the help of a metal or plastic dough scraper, cut the dough into 6 equal pieces (or larger if you want to make larger pizzas).
NOTE: To avoid the dough from sticking to the scraper, dip the scraper into water between cuts.
5. Sprinkle some flour over the dough. Make sure your hands are dry and then flour them. Gently round each piece into a ball.
NOTE: If the dough sticks to your hands, then dip your hands into the flour again.
6. Transfer the dough balls to the lined jelly pan and mist them generously with spray oil. Slip the pan into plastic bag or enclose in plastic food wrap.
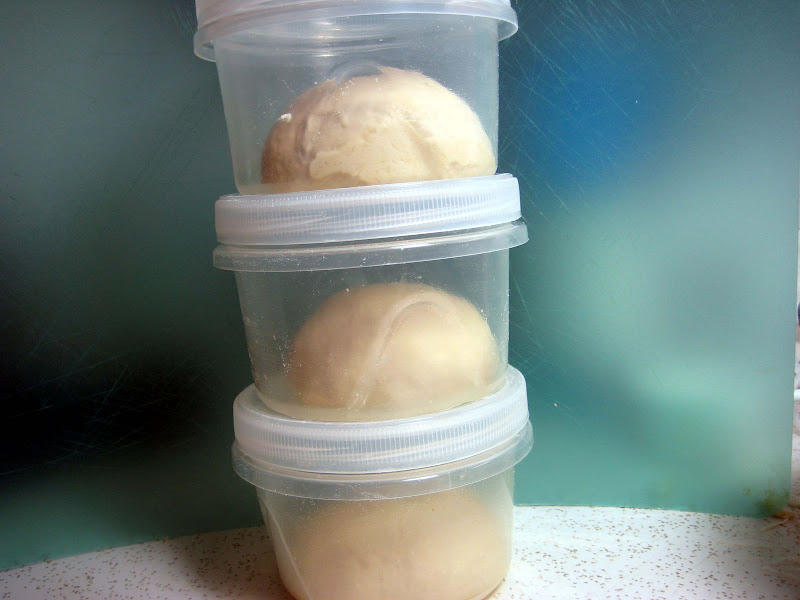
7. Put the pan into the refrigerator and let the dough rest overnight or for up to thee days.
Dough packed and ready for the refrigerator... Each dough ball is about 170 grams each.
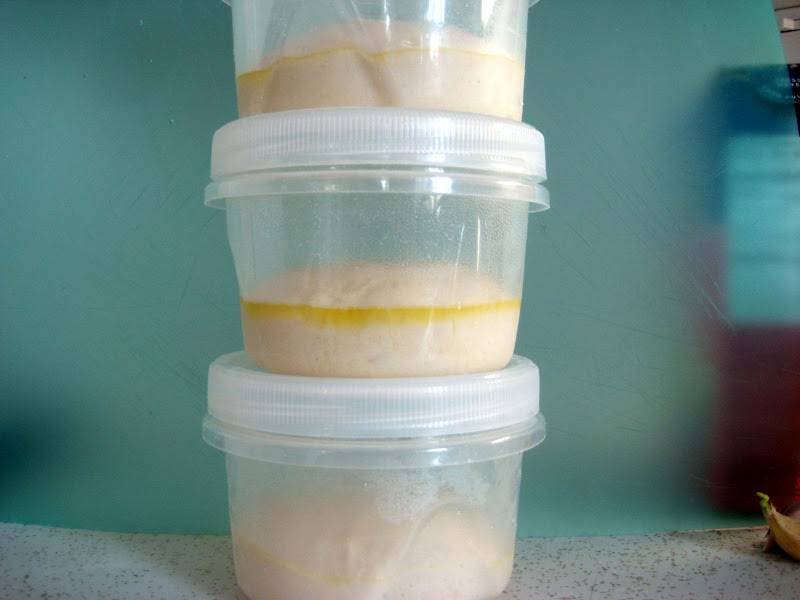
NOTE: You can store the dough balls in a zippered freezer bag if you want to save some of the dough for any future baking. In that case, pour some oil(a few tablespoons only) in a medium bowl and dip each dough ball into the oil, so that it is completely covered in oil. Then put each ball into a separate bag. Store the bags in the freezer for no longer than 3 months. The day before you plan to make pizza, remember to transfer the dough balls from the freezer to the refrigerator.
DAY TWO
The next day - out of the fridge.
8. On the day you plan to eat pizza, exactly 2 hours before you make it, remove the desired number of dough balls from the refrigerator. Dust the counter with flour and spray lightly with oil. Place the dough balls on a floured surface and sprinkle them with flour. Dust your hands with flour and delicately press the dough into disks about 1/2 inch/1.3 cm thick and 5 inches/12.7 cm in diameter. Sprinkle with flour and mist with oil. Loosely cover the dough rounds with plastic wrap and then allow to rest for 2 hours.
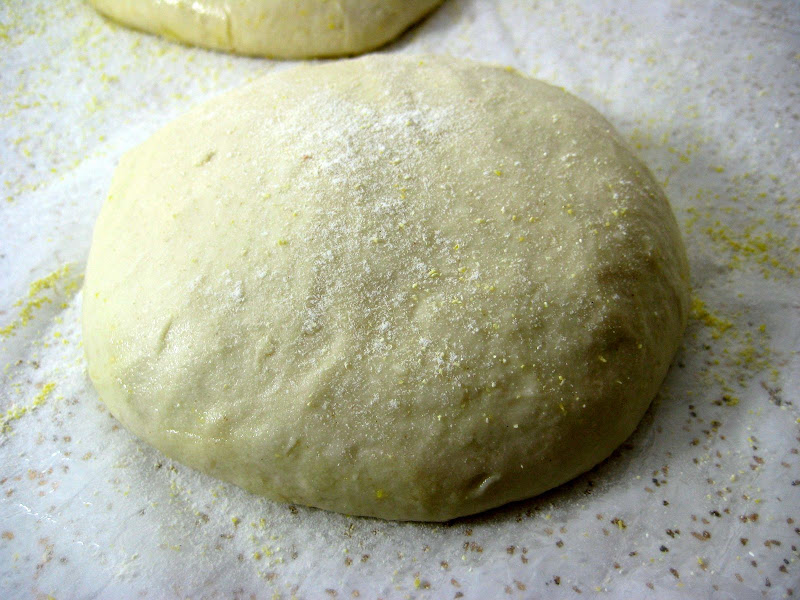
Dough taken out of the container. Dusted with a flour/corn meal mixture.
9. At least 45 minutes before making the pizza, place a baking stone on the lower third of the oven. Preheat the oven as hot as possible (500° F/260° C).
NOTE: If you do not have a baking stone, then use the back of a jelly pan. Do not preheat the pan.
10. Generously sprinkle the back of a jelly pan with semolina/durum flour or cornmeal. Flour your hands (palms, backs and knuckles). Take 1 piece of dough by lifting it with a pastry scraper. Lay the dough across your fists in a very delicate way and carefully stretch it by bouncing it in a circular motion on your hands, and by giving it a little stretch with each bounce. Once the dough has expanded outward, move to a full toss.
NOTE: Make only one pizza at a time.
During the tossing process, if the dough tends to stick to your hands, lay it down on the floured counter and reflour your hands, then continue the tossing and shaping.
In case you would be having trouble tossing the dough or if the dough never wants to expand and always springs back, let it rest for approximately 5-20 minutes in order for the gluten to relax fully,then try again. You can also resort to using a rolling pin, although it isn’t as effective as the toss method.
11. When the dough has the shape you want (about 9-12 inches/23-30 cm in diameter - for a 6 ounces/180g piece of dough), place it on the back of the jelly pan, making sure there is enough semolina/durum flour or cornmeal to allow it to slide and not stick to the pan.
12. Lightly top it with sweet or savory toppings of your choice.
NOTE: Remember that the best pizzas are topped not too generously. No more than 3 or 4 toppings (including sauce and cheese) are sufficient.
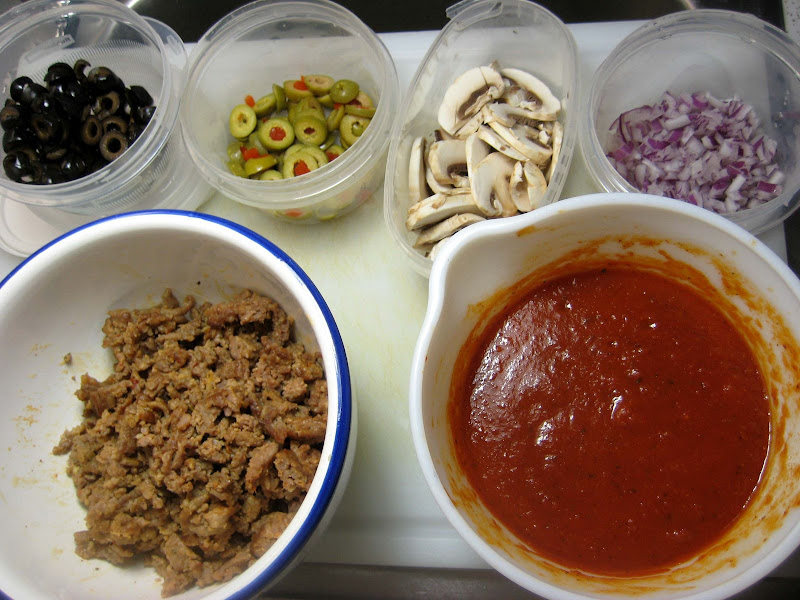
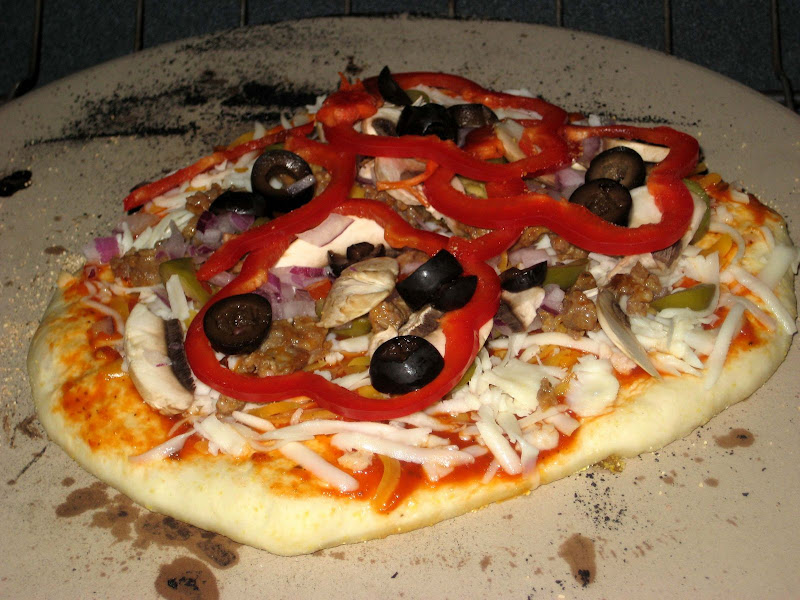
My toppings at the ready - olives (black and green), mushrooms, red onions, tomato sauce and mild Italian sausage. Cheese is not shown - mozzarella and cheddar.
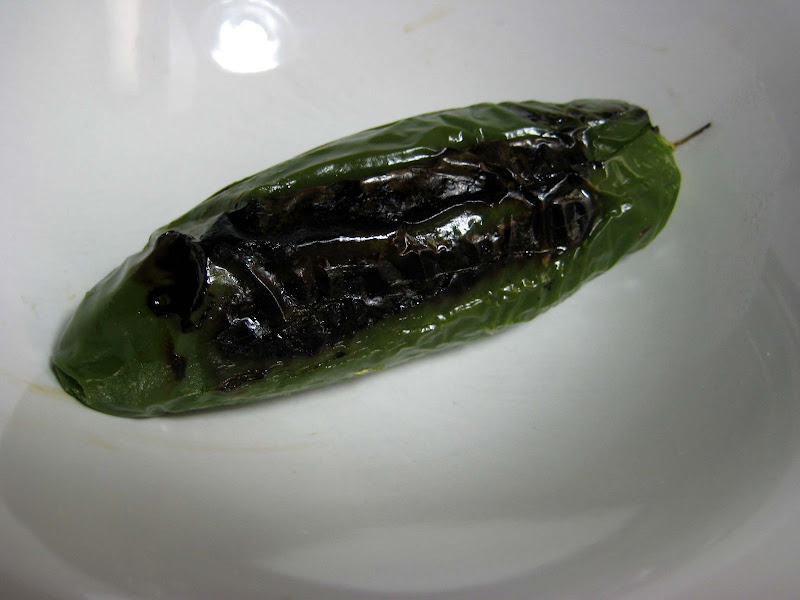
My secret ingredient! A roasted jalapeno pepper which I peeled and diced.
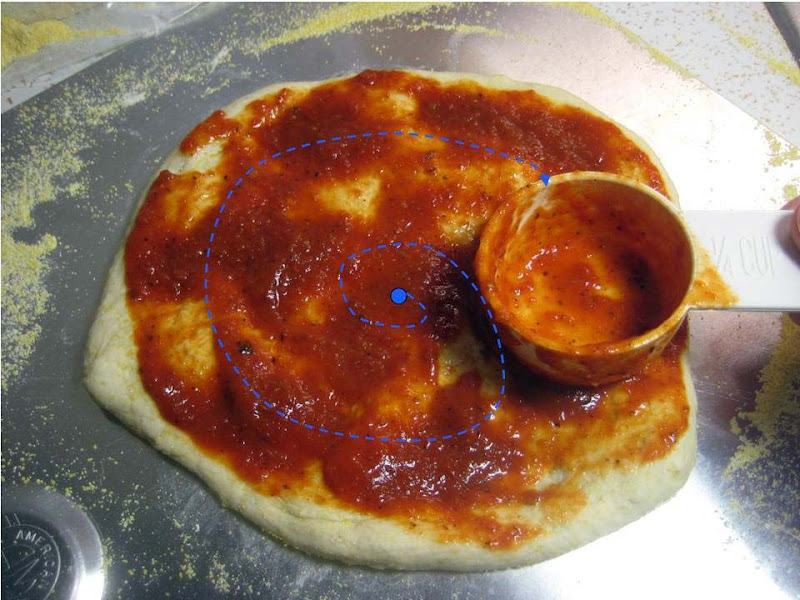
Based upon the many good pizza making videos on YouTube, this is a neat way to sauce a pizza.
Ladle sauce onto the center and use the bottom of the ladle to swirl the sauce to the edges. I used 1/4 C of sauce for a 10" pizza.
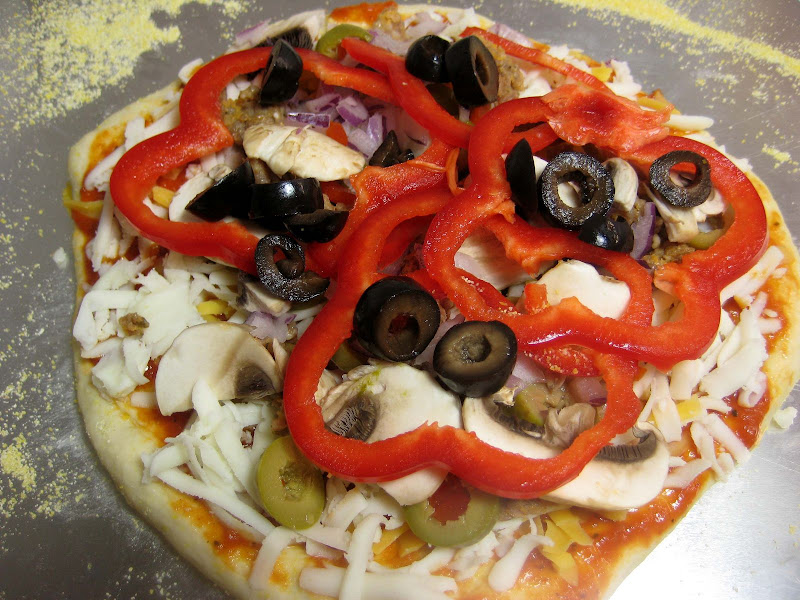
I tend to overload the pizza, but that's the way I like it.
13. Slide the garnished pizza onto the stone in the oven or bake directly on the jelly pan. Close the door and bake for about 5-8 minutes.
Note: Since this pizza dough recipe is on the sticky side, I had to use a length of dental floss to loosen the pizza from the peel and a spatula to slide the pizza onto the stone.
NOTE: After 2 minutes baking, take a peek. For an even baking, rotate 180°.
If the top gets done before the bottom, you will need to move the stone or jelly pane to a lower shelf before the next round. On the contrary, if the bottom crisps before the cheese caramelizes, then you will need to raise the stone or jelly.
14. Take the pizza out of the oven and transfer it to a cutting board or your plate. In order to allow the cheese to set a little, wait 3-5 minutes before slicing or serving.
Total Baking Time: 8 Minutes
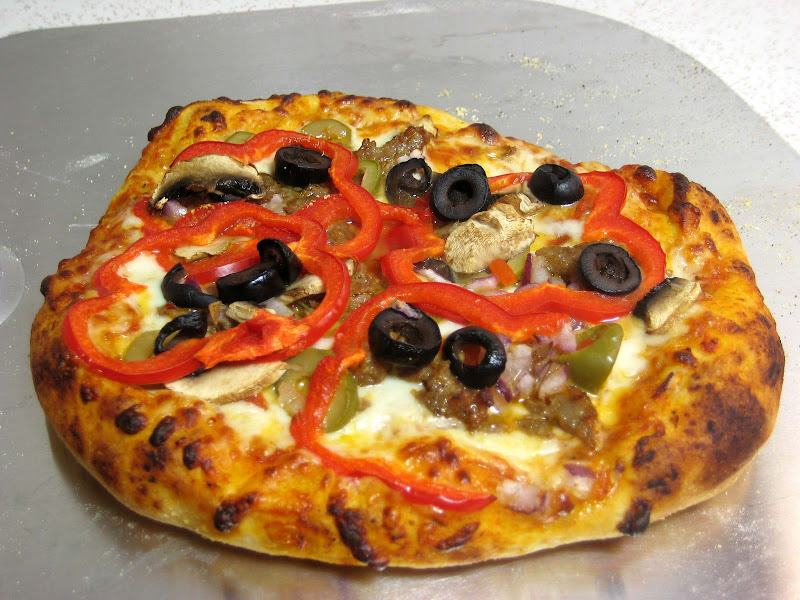
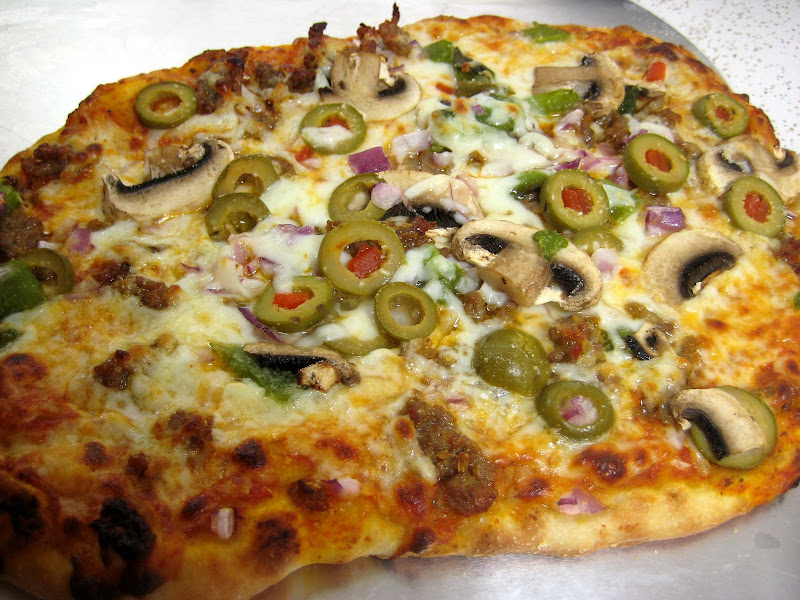
This is actually Pizza #3: My demo pizza with everything.
The first two pizza were made for quick consumption and only a couple pictures were taken. We were hungry! LOL! With this third pizza, we could spend the time taking step-by-step photos.
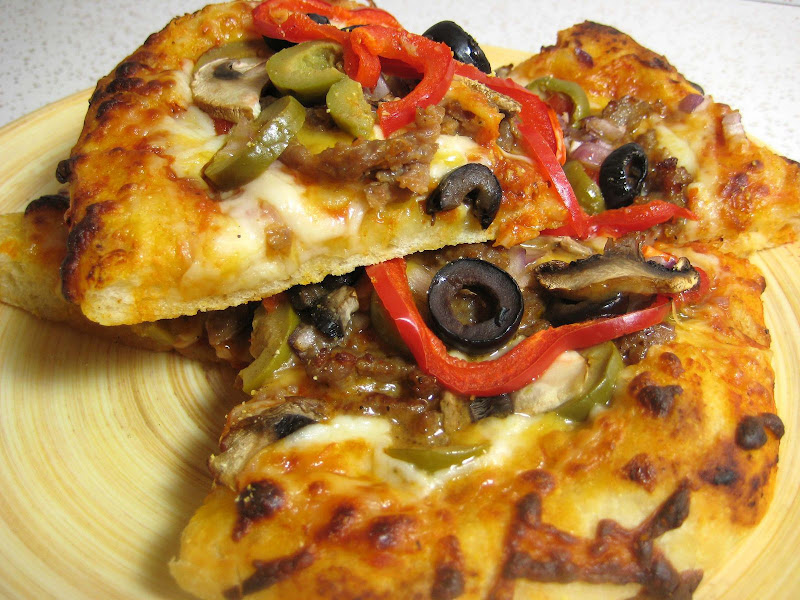
Pizza with everything
Nicely cooked crust. I purposely made this crust with a thicker crust.
The First TWO Pizzas!
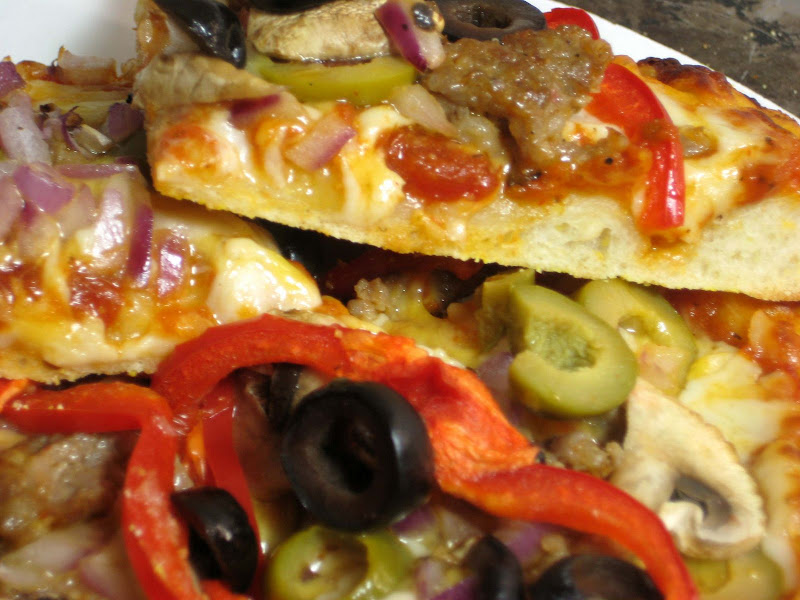
Reinhart's recipe is a wet dough using a 69% water to flour ratio. Most pizza dough recipes use a 60% water to flour ratio. Due to the higher water ratio, the crust spreads out very easily and makes for a thin pizza crust.
The resulting pizza crust turned out thin, light and airy. Almost too thin for the amount of toppings I used.
Overall, the pizza was very good.
For this challenge, here's the mandatory pizza tossing photo. Since it's so close to Halloween, I decided to wear my costume for the pizza tossing photo.
In the USA, when you flip through the phone book, Italian restaurants use a Chef Boyardee-like icon for their ads - a chef with a large handlebar mustache, wearing a chefs hats and chef's coat. Being a foodie, I couldn't go as a vampire or Frankenstein. I wanted to be a chef with a handlebar mustache! :-)
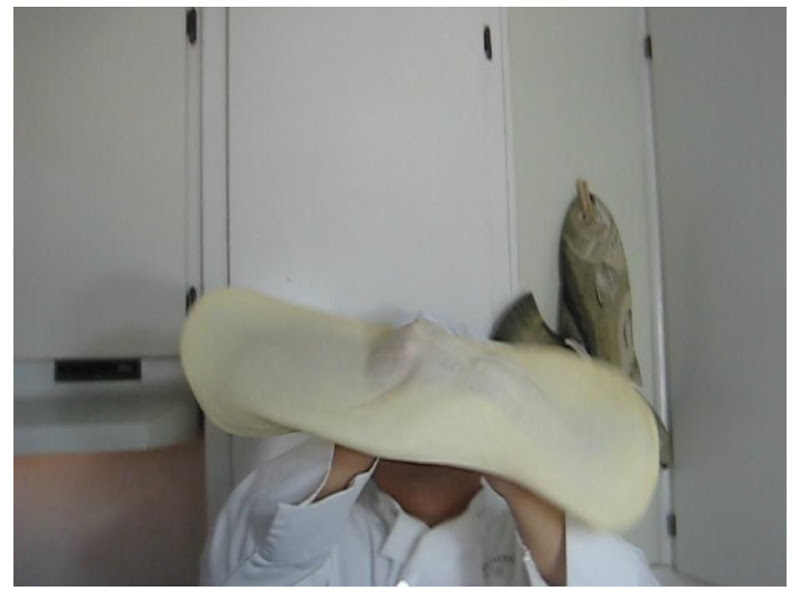
I noticed that tossing the pizza stretches the crust paper thin.
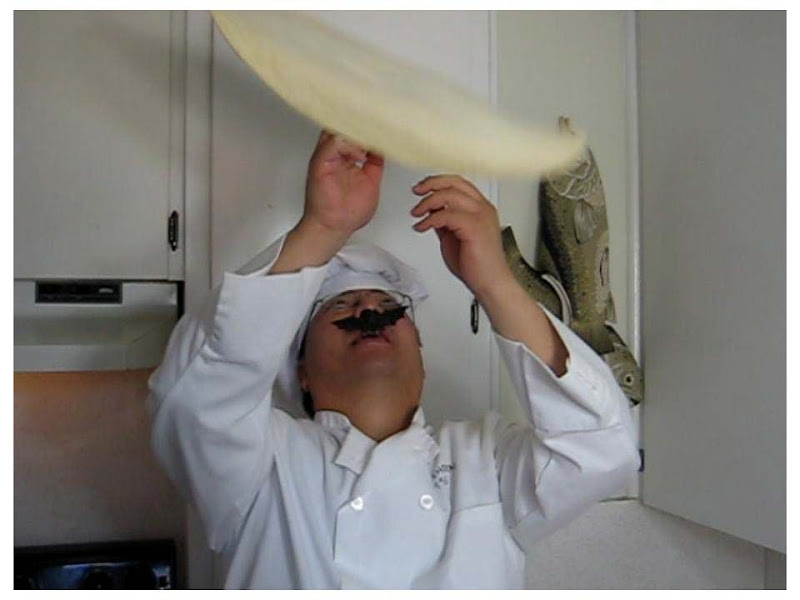
Whew! I caught it! No drop... No whole... Hat and mustache still in place.
Pizza #1: green olive, sausage, mushroom, onion, roasted jalapenos and mozzarella.
Not shown: Garnished with fresh chopped tomatoes.
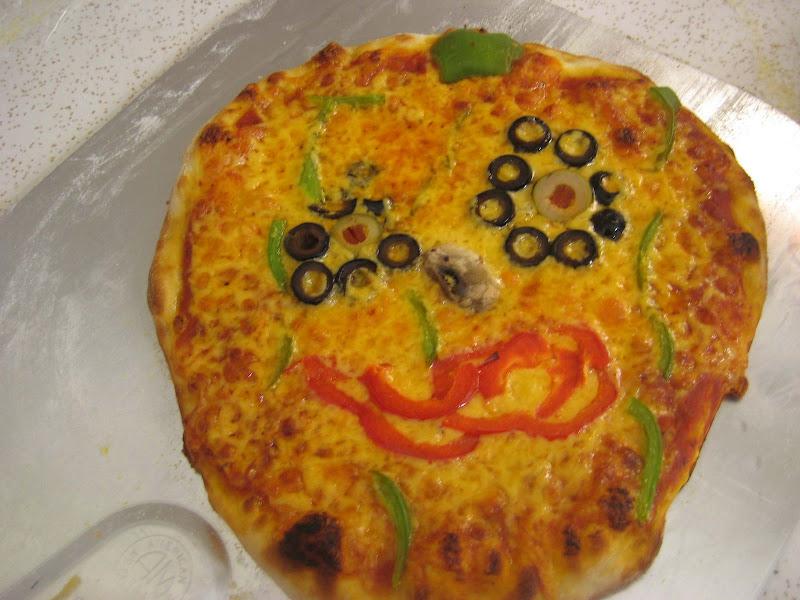
Pizza #2: My Jack O'Lantern Pizza: Cheddar (instead of Mozzarella), green and black olives, green and red bell peppers. The cheddar added a nice saltiness to the pizza.
Overall, the pizza turned out delicious. The crust turned out light and not too bready. However, I'm not sure if I would use such a high water ratio the next time around, 69%. My tendency is to be around %60 or until the dough feels right.
That's this month's challenge!
Making pizza dough is pretty straight forward and the ingredients for the dough are minimal - water, flour, yeast, a little oil and some salt and sugar.
I hope you all get around to making a pizza pie.
HAPPY HALLOWEEN!

29 comments:
John really like the fake moe (?). As always in-depth photos and detailed steps, a joy to read. Yours Audax
Wao! I wanna go to Pizzeria Giovanni right now and order one of your pizzas! Look incredible!
Great tossing ;-P! Your pizzas look really scrumptious!
Cheers,
Rosa
You are hilarious. Great pictures especially the one of you tossing with chef outfit, gear and all. :)
I'm way impress with the toss. I wasn't able to get that high of a toss, or that large of a crust - wouldn't fit on my peel. Great pizzas, great post.
I love all the pictures. What a happy looking pizza! :)
What a great post. The pictures are superb! The pizza looks even better. I really enjoyed reading this. Great job.
Wow, that tossing action look so cool! Your pizza look so mouth watering. My stomach rumbling as soon as I see your pizza. Delicious!
I'm digging the chef hat and mustache! Your pizzas are so beautiful. Well done!
Great looking pizzas!! As for the tossing photos, well they should be in a Pizza 101 textbook, looks as if you have tossed quite a few!!! Wonderful job!!!
Beautiful tossing (love the mustache!) Nice pizzas, I like your choice of toppings. Well done.
John...ops, pardon...Giovanni :-D You are incredible!!!! That was a very amusing challenge, wasn't it?
Big kisses
Ago :-D
Oh ho! That was the most fun DB blog that I've read today! I want to cook with you next time. Looks like you have a ball! The mustachio is a nice touch, by the way.
Nice looking pizzas, and the added ingredient of "fun" must have made them delish.
That fake mustache is hilarious.
GREAT tossing.
Love your photos.
I love your post! Happy Face pizza yay! Your tossing is fab!
Fantastic pizzas John. Especially love the pizza tossing shot!
Mel - TheKitchenEnquirer
your pizzas look delicious. i like the jack-o-lantern one! i love all the pics.
and thanks for the stop to my blog :)
I love your pizzas and the tossing pics. Thanks so much for welcoming me to DB. It's been a joy!!
P.S. Can I have a slice of your pizza #1. It looks terrific!!!
You have great looking pizzas, yourself! Love your tossing pics. Great outfit. Love it.
Thanks for stopping by my blog. :D I'm gonna add you to my reader.
Your pizzas turned out phenomenal looking. I love green olives. Your tossing of the pizza was fantastic!!
workinggreenmom.blogpost.com
Oh my gosh! Your toss, your pizzas and your outfit are perfect. Darn, wish I would have made my crust thick too. Thanks for stopping by.
Thanks for saying hi! I loved your pics... nice hat and mustache :) Your pizza looks amazing!
I knew you'd do something amazing and cool, and yet again, you did! As usual, love the photgoraphs, the pizzas etc, but you as Chef Giovanni tossing the dough is priceless! Awesome job!
Amazing pizz!!!
Great job tossing and lol at Chef's hat and moustache! Thanks for sharing your pizza sauce recipe and secret too :)
great tossing!! You look like a pro!
Thanks for sopting by my blog too.
wow..some elaborate toppings on the menu! Your pizza looks yummy! Cool chef's outfit effects on the tossing.
Thank you! It was super fun making pizza for my first challenge. Even though I totally couldn't toss it. Ha. Hopefully I'll get better by this month's challenge.
Way to go the extra mile, I love the outfit. Your pizza look super yummy, great job. Thank you for welcoming me into the DB group. Ciao
Post a Comment